
In order to create testimonial lists, it is assumed that a number of steps were previously completed. We should have connected (at a minimum) Google and Facebook. We should have defined Testimonial filtering rules, and we should have published testimonials on your website. Finally, we will have created at least a single list, and possible more than one list. This process will take no longer than ten minutes.
Lists are groups of testimonials. At least one list must be created before you can assign a list to website locations (as shown below). You should create a single list initially, and then find time every now and again to build a more comprehensive list library. The idea with testimonial lists is that you show Testimonial sliders with the most relevant testimonials. First Home Buyers, for example, should be shown FHB testimonials, and Investors should be shown reviews that are more relevant to them.
Note: If you have not created a default style for your testimonial slider yet, you should do so before continuing. If a default style is not defined, the default Yabber styling will be applied.
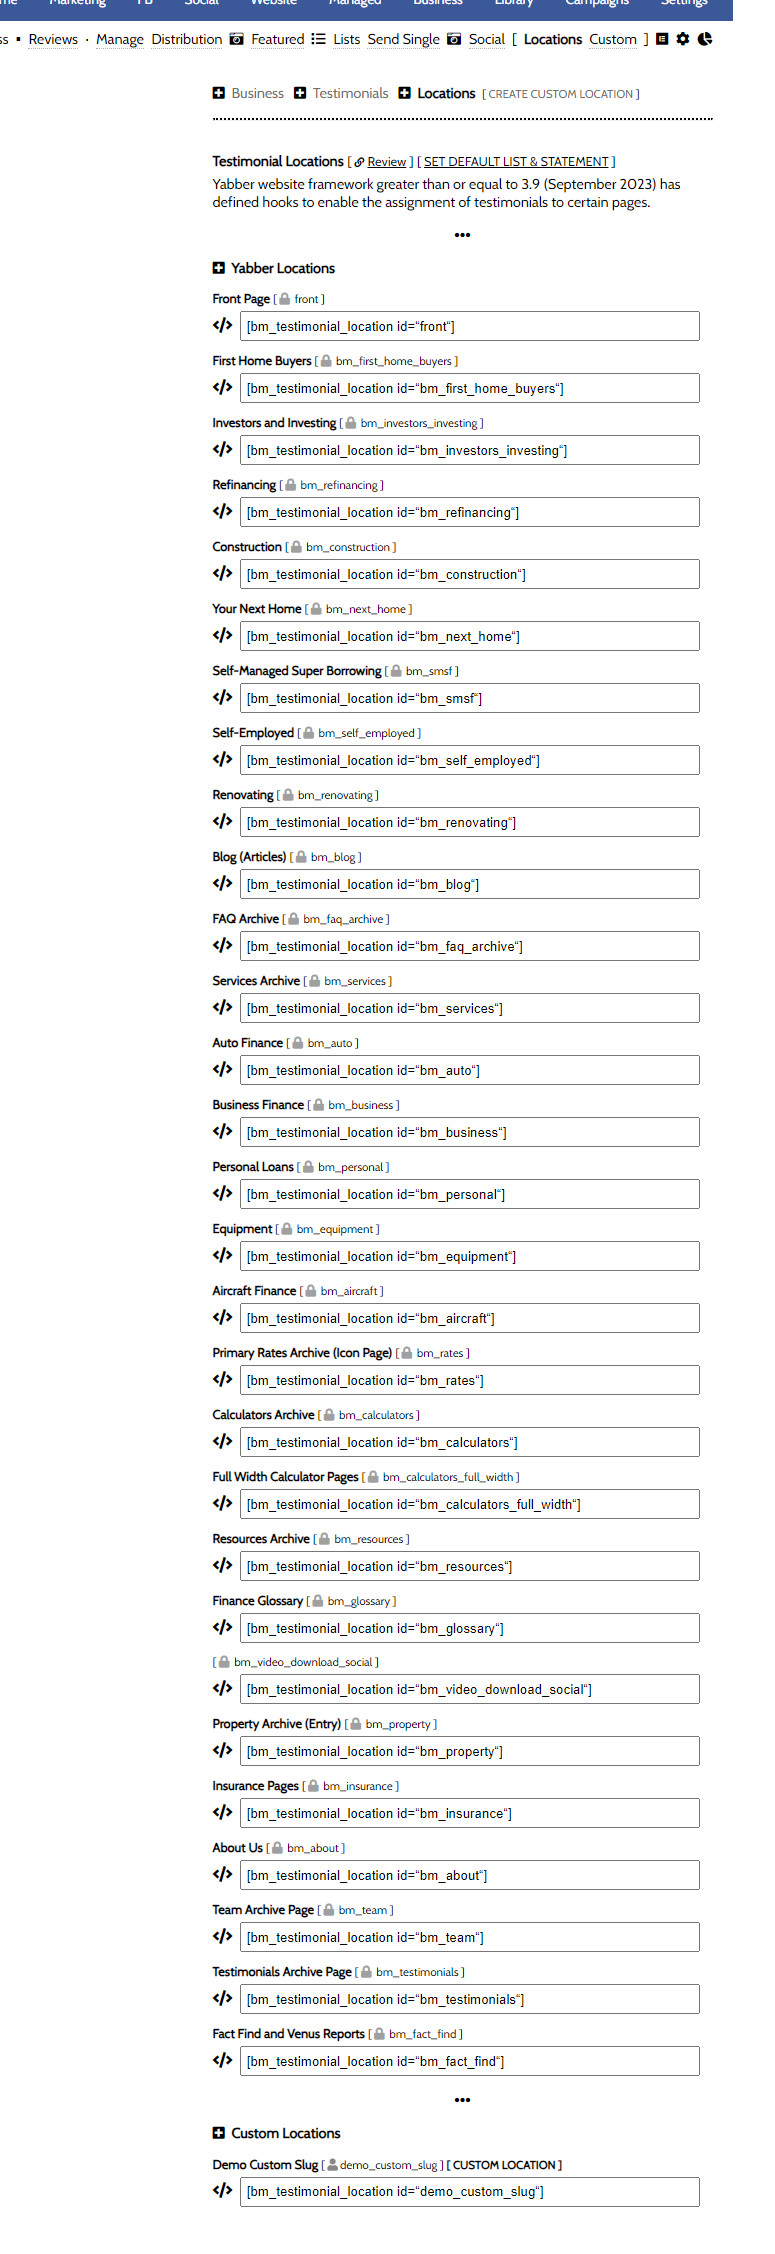
Testimonial Locations
A number of pages on your website include a 'placeholder' for Testimonial sliders. When a testimonial list is assigned to any of these locations, a testimonial slider will be shown. If no testimonial slider is assigned, nothing will be shown.
The shortcodes applied to various areas of your website are available via a panel  where they're all listed (this becomes relevant if you need to update your framework to support the evolved features). You will find the shortcode link within the 'Locations' panel.
Initially, it is quite acceptable to share a single testimonial slider list to all locations.
The Testimonial Statement (Heading)
As you'll see in a moment, when we assign a list to a location, we also have the option of assigning a Statement. This statement is a title and paragraph that optionally introduces the slider. To make life easy for yourself, and assuming that you wish you use a title for your Testimonial sliders, create a single Statement called something like 'Default Testimonial Title', and this may optionally be assigned.
The assignment of a Statement (heading) to your Testimonials makes it very easy to update in the future.
Assigning Testimonial Lists to Locations
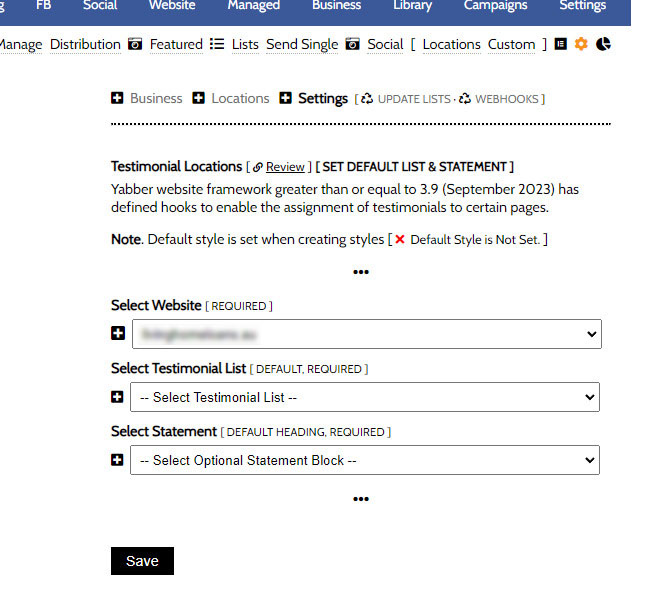
To assign your lists to various Testimonial Locations, navigate to the 'Locations' panel. Select your website and submit. A panel will be returned where you're able to assign a list, Statement, and style to the selected style.

Pictured: To assign your lists to various Testimonial Locations, navigate to the 'Locations' panel. Select your website and submit. A panel will be returned where you're able to assign a list, Statement, and style to the selected style. Note that in the pictured example (under the website select menu, we have not not defined a Default Style. This is okay, but isn't best practice. You should create a default style first. There's a 'Settings' panel where you may optionally define default values so we're able to render Testimonials where an invalid or inactive list is referenced.
Once complete, Save. The data updates your website immediately, and changes take effect immediately - a message will be returned indicating as such.
You will note in the pictured example that some of the Locations have a red border. This indicates that no Testimonial Block is assigned. In the case of the associated Statement and Style, the first option presented will always be 'Default' (unless altered and saved with different values).
The Result
After lists are assigned to locations, the Testimonials will be presented in a format consistent with your assigned Style, and a Statement will be applied above the slider if defined. The slider will contain Testimonials only from those that were assigned to the specific list.
You may update lists, Testimonials, styles, and Statements, at any time.
Custom Locations
You may created additional Locations via the 'Custom' panel. This provide a facility to create your own Location Shortcode that will be replaced with a Testimonial list.
The first part of this process is to create a custom location name. For our example, we'll use 'Example Custom Location'. Once created, this 'Location' will be made available within the 'Location Assignment' panel.

Pictured: In our example we've created a custom location with the name of 'Example Custom Location'. Once created, this 'Location' will be made available within the 'Location Assignment' panel. In most cases, you will create a custom slug: this is for aesthetic housekeeping - it's nicer to have a slug with underscores to separate words rather than the long string we create by default.
A single shortcode will then be copied wherever you would like the Custom Testimonial List to be assigned. This shortcode is listed in the Review panel. The shortcode takes on the format [testimonials id="my_custom_location"], and it may be copied anywhere as is, or used with the Elementor shortcode drag-and-drop block.
■ ■ ■
Related Testimonial FAQs
Related FAQs and features relating to the Testimonial Module.
When Testimonials are received - regardless or whether of not they're - we will manufacture a suite of testimonial images that are suitable for social media. These images are all sent to your once created. The Vista assignment will be blank, meaning that they won't send to any social networks; you should review the images,… [ Learn More ]
With the exception of Location Testimonials (or Testimonial hooks for specific lists on your website, the Elementor Testimonial Block is the primary method for rendering Testimonials on your website. With all the Testimonial options we've introduced via a number of FAQs, the Elementor Block may be used in isolation of any Yabber tool to manage… [ Learn More ]
The Testimonial module is extremely extensive. The framework permits you to assign a single style to all Testimonial sliders, or you may assign individual styles to Sliders where necessary. The tends to expose how the system functions - this FAQ deals only with how to create and manage the styles. You will find the Testimonial… [ Learn More ]
In order to create testimonial lists, it is assumed that a number of steps were previously completed. We should have connected (at a minimum) and . We should have defined , and we should have on your website. Finally, we will have , and possible more than one list. This process will take no longer… [ Learn More ]
In order to create testimonial lists, it is assumed that a number of steps were previously completed. We should have connected (at a minimum) and . We should have defined , and we should have on our website. This process will take no longer than a few minutes. Lists are groups of testimonials. At least… [ Learn More ]
Publishing Testimonials to your website requires that you have first connected the necessary social networks and set up . The filtering will start sending testimonials to your websites as soon as they're received by Yabber. All testimonials are sent as drafts and will only publish once each testimonial is approved by you (unpublished testimonials will… [ Learn More ]
Before any testimonial makes its way to your website, we must first create filtering rules. Before any filtering can be applied, we must first connect and (at a minimum). This will populate our registered business locations and assign Yabber with the permissions that are necessary to periodically retrieve reviews. Reviews from multiple sources and multiple… [ Learn More ]
The testimonial module is the most versatile in the finance (or any other) industry. We suggest you use it and take full advantage of the system. The Testimonial module will perform the following functions: Automatically pull reviews, testimonials, and recommendations from a growing list of services. The system will publish each review to all of… [ Learn More ]


