
Your website forms made available in Yabber and on your website are one of the most important marketing assets in your toolkit. They're the conduit that connects your website to Yabber and triggers the applicable automation schedules, logs the lead or prospect, and provides you with relevant notifications. Integration is made with various CRM systems, SMS messaging, email autoresponders, and so on.
Formly Version 2: This FAQ was updated on 27th August 2024 to cater for Yabber and Website framework updates. The features were first released in framework version 202407. If you have an older framework you should make contact with us to schedule an update. The update coincides with a requirement to update your Microsoft application to cater for additional permissions.
Related Reading: See also the FAQ on the The Leads and Prospects Table.
The Subscription Forms in Yabber are considered a primary funnel entry point. Each form will triggers its own automation schedule, and each will have various other automation defined based on the way or location the form is used. The applicable (and probably hidden) campaign-related funnel FAQs should be referenced for a big-picture understanding of the funnels that might be used; this FAQ deals simply with how to create the form and define the automation associated with a specific form.
Form Triggers: Forms are a siloed module with specific types of automation made available. Additional automation can be assigned (as described shortly) by way of an additional Triggerly automation profile. Although rarely required, you may review how to create a supplemental automation scheduled in an article on Marketing Triggers.
Subscription forms are integral to landing pages, the two-panel Simple Panels, and other form marketing assets. Various conditional features apply, such as form escalation, and the entire module is heavily integrated with Elementor and the broader broker website framework. Placing and/or assigning forms on your website are discussed in other FAQs.
We're worked very hard to ensure that the form modules in Yabber are the most powerful of their types in the industry.
Requirements
Certain assumptions are made when you create a form, such as Microsoft 365 and Facebook Connectivity, the creation of a company SMS application, and the creation of various mailing lists. For most users, these actions are completed for you.
Creating a Form is Easy
While we've created this FAQ, the creation process is intuitive, and you can generally skip the details below and go straight to creating a form. Each panel provides enough context in order to apply the specific automation or feature.
The Solis Module
If the Solis module is assigned to your account, everything below is largely redundant since all campaigns are created in a single click (as are the associated landing pages, email sequences, and other campaign assets). The Solis module is the heart of Yabber, although custom campaigns will almost always deliver better results.
■ ■ ■
Subscription Form General Appearance
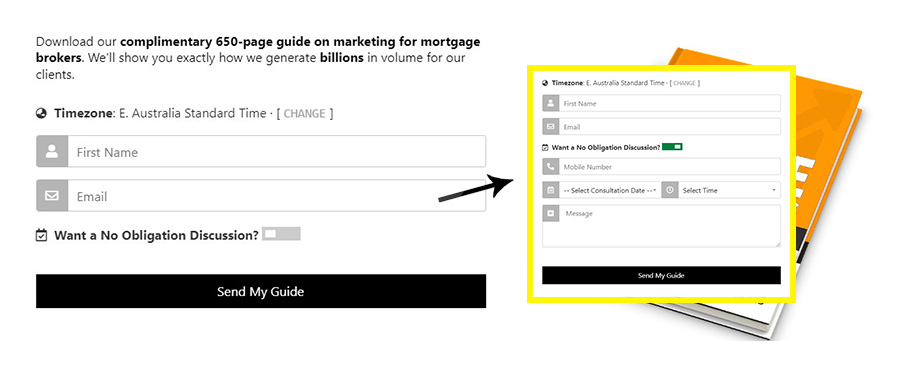
Shown is the general appearance of the Simple Panel with the insert showing the expanded calendar panel. The form itself is just a form - it includes an upper and lower panel, with the lower panel hidden behind a slider option.

Pictured: Shown is the general appearance of the Simple Panel with the inset showing the Outlook-integrated calendar options. The form itself is just a form - it includes an upper and lower panel, with the lower panel hidden behind a checkbox option.
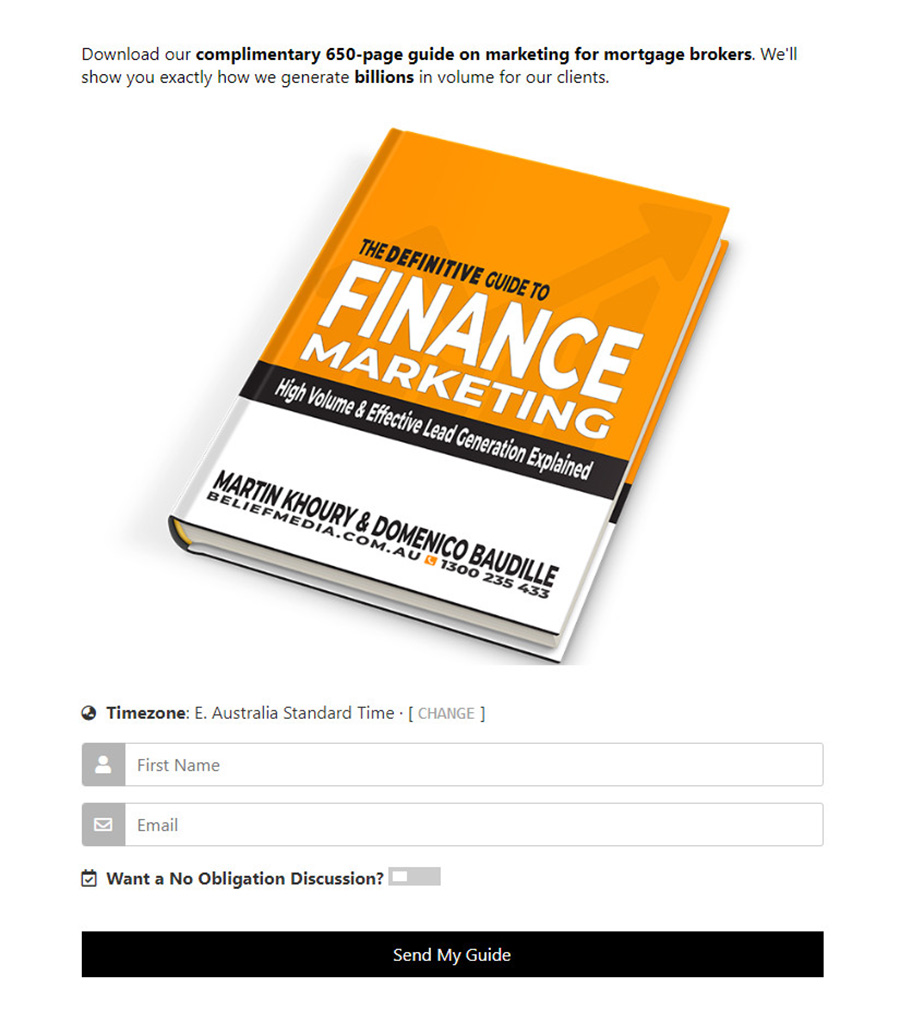
The basic form format doesn't include the video or image to the right in a panel form (this is referred to as the 'Simple Panel'). The standard form that we'll generally apply on your website is a standard single column form, and images and style are applied to the form container. In the example below we've used a standard form with an image above the form - this is the format of form we'll generally use below each post or page on your website.

Pictured: Standard subscription form with an associated image shown above the form.
Related Reading: See the FAQ on How to Create a Simple Panel. There are a large number of form options, such as the Property Report Form.
Related Reading: A minimalistic and inline single-line submit button is available as a 'known user' option. See the FAQ titled How to Hide Subscription Form Fields.
Calendar options are either hidden behind the checkbox or shown in the primary field panel. Available calendar dates and times are sourced from your Microsoft 365 Calendar, so the calendar requires that you correctly define your timezone and work hours. More on this shortly.
Form Components
The formly updates include the facility to create 'components'. These components may be recycled over and over again and assigned to any form you create. This method supports your agile marketing methods and allows forms to be created in seconds once the primary components are defined. Components will become clear as we move through form creation.
Locating the Forms Module
The Subscription Forms will be found by following the 'FORMS' link in the Website module. From the Forms module, select 'Lead Forms'. The subscription form creation panel is returned.

Pictured: The Subscription Forms will be found by following the 'FORMS' link in the Website module. From the Forms module, select 'Lead Forms'. The subscription form creation panel is returned.
The Form Creation Panel
The form creation panel is the area where individual forms are defined. The first time you see the panel it'll look a little daunting, and perhaps overwhelming, but this is only because of the large number of options availed to you. Almost all options are optional, so many component panels are initially hidden.
If you are familiar with the former form module you will recognise that forms are now created on a website-by-website basis rather than simply sending all forms to all sites - this change was necessary to support segregated usage within a franchise-style environment.

Pictured: The form creation panel is the area where individual forms are defined. The first time you see the panel it'll look a little daunting, and perhaps overwhelming, but this is only because of the large number of options availed to you. Almost all options are optional, so many component panels are initially hidden.
Here's where it might look a little messy. If we expand the hidden form fields the creation panel starts to look a little daunting.

Pictured: If we expand the hidden form fields the creation panel starts to look a little daunting. It can get messier - some options are only made available to certain users, and custom options are often applied.
Each of the options shown is considered a component, so we're very rarely creating new components when creating a new form, or we're only creating the one or two components that may be necessary.
We'll step through the form process detailing only the most common components. Those advanced options will be linked towards the bottom of the FAQ. The components are listed in no particular order.
Name, Description, and Campaign
A name should be given to your form. This name is used in Yabber and Elementor (drag-and-drop widgets), The description is used for your own reference, and for our in those cases where your efforts are supported. A campaign should be assigned to each form. The campaign is the same campaign that might be assigned to landing pages and other assets, so it's a global definition. In most cases, and certainly early on, you may simply create a campaign called 'Website Forms'.

Pictured: A name should be given to your form. This name is used in Yabber and Elementor (drag-and-drop widgets), The description is used for your own reference, and for our in those cases where your efforts are supported. A campaign should be assigned to each form. The campaign is the same campaign that might be assigned to landing pages and other assets, so it's a global definition. In most cases, and certainly early on, you may simply create a campaign called 'Website Forms'.
The primary function of the campaign attribute is to refine and segregate statistical data.

Pictured: The primary function of the campaign attribute is to refine and segregate statistical data. The campaign is essentially a siloed Objective, so individual campaigns will usually be created for any transient promotions, and they'll always be defined in the case of paid promotion.
Calendar Options and Calendar Body
The Calendar component determines what dates presented in your form are made available to potential leads. The default times that are returned to your form is predicated on the correct timezone defined in Outlook, so ensure you log into Outlook (if you haven't already) and select your local timezone.
The calendar is fully-integrated with Microsoft 365 so any submission will be created in your calendar, teams links will be sent, and other modification options apply.

Pictured: The Calendar component determines what dates presented in your form are made available to potential leads. The default times that are returned to your form is predicated on the correct timezone defined in Outlook, so ensure you log into Outlook (if you haven't already) and select your local timezone. The calendar is fully-integrated with Microsoft 365 so any submission will be created in your calendar, teams links will be sent, and other modification options apply.
Calendar profiles may be created for any individual in your organisation (with a registered calendar, or shared calendar), and unlimited profiles may obviously be created.
You will note the option to select your calendar body. This is the body of the calendar message sent to your lead. Use this as a conversion mechanism and include notes, links to documents, attachments, and so on. Include your phone number and instructions on how to alter the booking if it's required. A large number of placeholders apply.

Pictured: You will note the option to select your calendar body. This is the body of the calendar message sent to your lead. Use this as a conversion mechanism, so include notes, links to documents, attachments, and so on. Include your phone number and instructions on how to alter the booking if it's required. A large number of placeholders apply.
Form Ownership, and List Management
The block of options towards the top of the page under the Form profile information is the ownership and list management block. You should select the general 'owner' of this form, and then define the email and/or SMS list that any incoming leads will be assigned. In the case of each list, select if the applicable autoresponder list associated with the list will be applied.
The assigned 'child' autoresponder list is important and should generally be created in line with our follow-up education email policies. As detailed shortly, and further described in the FAQ titled 'How to Create and Manage Form Conditional Redirections and Conditional Emails', the first two emails are generally handled via the form with subsequent emails handled via the autoresponder program.
The Microsoft Contact
Yabber relies on Microsoft contacts for most contact management. When a lead is created it should be assigned to a parent Microsoft Folder (largely deprecated in the new Office 365 but continued to be used), and we'll assign the lead to any number of 'Categories'. Existing folders and categories will be shown (and searchable) when you select the applicable field. Keep to existing categories if they already exist for filing cleanliness.

Pictured: Yabber relies on Microsoft contacts for most contact management. When a lead is created it should be assigned to a parent Microsoft Folder (largely deprecated in the new Office 365 but continued to be used), and we'll assign the lead to any number of 'Categories'. Existing folders and categories will be shown (and searchable) when you select the applicable field. Keep to existing categories if they already exist for filing cleanliness.
Microsoft contact lists and categorised groups are used in multiple modules, such as group SMS messages.
The First and Second Email
When a user subscribes to any child email list, the first and second email are immediately scheduled. The creation of these emails, and the reason for their segregation from the primary list, is detailed in a section to follow. If these emails are created, they should be assigned; if not, appropriate emails should first be created..

Pictured: When a user subscribes to any child email list, the first and second email are immediately scheduled. The creation of these emails, and the reason for their segregation from the primary list, is detailed in a section to follow. If these emails are created, they should be assigned now.
An FAQ dedicated to the creation of the first and second email is available in a post titled "How to Create the First and Second Autoresponder Email".
The Conditional Redirect and Progress Bar Style
The nature of the conditional redirect and conditional emails are created in an FAQ titled "How to Create and Manage Form Conditional Redirections and Conditional Emails". There's a little theory behind the purpose of the conditional features (in short, because this is an actual funnel), so the method is described in a standalone FAQ. The conditional features of the subscription form have a seriously significant impact on your conversions.
The 'Conditional Redirect Profile' is comprised of the page that should be redirected to after a basic subscriber, a telephone contact, or a calendar booking makes a submission.

Pictured: There's a little theory behind the purpose of the conditional features (in short, because this is an actual funnel), so the method is described in a standalone FAQ. The conditional features of the subscription form have a seriously significant impact on your conversions.
The conditional redirect will send the user to an applicable page after a subscription (and the first email will also be determined by the redirect type).
Note the option for the 'Progress Bar Style'. This is the style applied to the small dynamic progress bar that is shown as your success or error message is shown, and before the redirection takes place. The Progress Bar Style is defined under the 'Redirect' child menu under the 'Progress Style' tab.

Pictured: Note the option for the 'Progress Bar Style'. This is the style applied to the small dynamic progress bar that is shown as your success or error message is shown, and before the redirection takes place. The Progress Bar Style is defined under the 'Redirect' child menu under the 'Progress Style' tab.
The Progress Bar style is normally defined just once and recycled over and over for each form.
Subscription Form Fields and Style
For the purpose of this FAQ, let's (incorrectly) assume that the form fields are limited to subscription form fields and the calendar profile. In terms of presentation, style is also a client-facing consideration, so let's move through each of these.

Pictured: For the purpose of this FAQ, let's (incorrectly) assume that the form fields are limited to subscription form fields and the calendar profile. In terms of presentation, style is also a client-facing consideration, so let's move through each of these. Note that most of these profiles are created once and recycled across forms.
First, the fields applied to each form.
There are two components to each form: those items visible to the user at all times, and those options shown behind the content slider (you will optionally hide the phone number, calendar, and message field, if they're used). Turning off the three options I've just mentioned will disable the hidden panel altogether. An option exists for these three fields to be above the form or below the form. In essence, you can make a basic subscription form look however you want it to look.

Pictured: There are two components to each form: those items visible to the user at all times, and those options shown behind the content slider (you will optionally hide the phone number, calendar, and message field, if they're used). Turning off the three options I've just mentioned will disable the hidden panel altogether. An option exists for these three fields to be above the form or below the form. In essence, you can make a basic subscription form look however you want it to look.
Deselect those fields you don't want shown, and select those that should be shown. The text "Want a No-Obligation Discussion?" is used alongside the hidden content slider to return the hidden content.
Field Panel Format: The panel shown may look different to that pictured above. Some variants and clients are assigned to other panels that have a different presentation, but the functionality essentially remains the same.
The subscription panel style may be applied via the 'Style' panel. Virtually all form attributes may be styled, but we recommend only changing the submit button colour and text.

Pictured: The subscription panel style may be applied via the 'Style' panel. Virtually all form attributes may be styled, but we recommend only changing the submit button colour and text.
You will likely end up creating styles with only the text that differs, such as 'Send My Guide' or 'Send Video Link'.
Finally, we apply the calendar profile we created earlier. The calendar profile applied to a form determines what available timeslots are shown, and what automation will apply once the form is submitted.
The Microsoft Task
The Microsoft Task was previously submitted to Outlook as a general Outlook task. The updated module will create a task and assign an optional checklist in Microsoft's ToDo suite - all integrated with Outlook and Planner. This option is generally ignored and any task actions are generally assigned to Planner or a CRM.

Pictured: Formly will create a task and assign an optional checklist in Microsoft's ToDo suite - all integrated with Outlook and Planner. This option is generally ignored and any task actions are generally assigned to Planner or a CRM.
An FAQ that deals with creating Tasks is available in a post titled "How to Create a Microsoft or Yabber Task".
Email Interest Filtering
Email interest filtering applies when you would like to include a form field that asks something along the lines as "What are you Interest in?", with options such as First Home Buyer, Refinancing, Investment Finance, and so on. If defined for a form, a select menu will be applied to the form. Based on the user selection, a user will be assigned to a specific mailing list.

Pictured: Email interest filtering applies when you would like to include a form field that asks something along the lines as "What are you Interest in?", with options such as First Home Buyer, Refinancing, Investment Finance, and so on. If defined for a form, a select menu will be applied to the form. Based on the user selection, a user will be assigned to a specific mailing list.
Filtering is rarely applied because each form will have inherent purpose. The only suitable location for the menu might be on your primary contact form page.
Email filtering is discussed in an FAQ titled "How to Define Email Subscription Filtering Rules".
Form Success and Fail Messages
The 'Messaging' panel determines what message will show to a user after they submit a form. Messages are categorised under Success, Fail, and Spam. If no message is defined the default messages will be shown.

Pictured: The 'Messaging' panel determines what message will show to a user after they submit a form. Messages are categorised under Success, Fail, and Spam. If no message is defined the default messages will be shown.
Messages are created via the 'Msg' panel. A single panel is provided, and the type of message should be defined when saved.

Pictured: Messages are created via the 'Msg' panel. A single panel is provided, and the type of message should be defined when saved.
A custom message is usually appropriate when creating a form redirect - the message will indicate where the user will be sent.
Content Above and Below Form, and the Vertical Image
General content above and below the primary subscription form may be selectively recycled via the Content select options. Content is created in the appropriate panels, and it is then assigned to a form.

Pictured: General content above and below the primary subscription form may be selectively recycled via the Content select options. Content is created in the appropriate panels, and it is then assigned to a form.
Form content is created via the 'Content' panel. Create the content in the WYSIWYG editor and save. Like all other components, you should edit via the 'Review' panel.

Pictured: Form content is created via the 'Content' panel. Create the content in the WYSIWYG editor and save. Like all other components, you should edit via the 'Review' panel.
Selecting an image places an image above the form and below the upper text (as pictured earlier  ). You may still include an image in the standard editor, but this is discouraged.

Pictured: Selecting an image places an image above the form and below the upper text (as pictured earlier). You may still include an image in the standard editor, but this is discouraged.
To assign an image to your website library, first select your website, upload the image, provide a name and description, and save. The image is saved in your WordPress image library so it's available for all occasions.
Formly Advanced Automation
In an effort to keep this FAQ to a manageable length, the advanced options are introduced in brief. Where a standalone FAQ applies, the list item will link to the applicable post.

Pictured: In an effort to keep this FAQ to a manageable length, the advanced options are introduced in brief. Where a standalone FAQ applies, the list item will link to the applicable post.
Advanced options are as follows:
- Broker Email and SMS Notification
- Client SMS notifications for the various lead types.
- Microsoft Planner integration
- CRM Integration
- Hide Form Fields
- Facebook Custom Audiences
- Triggerly Profile and Additional Automation
- Webhooks
The inclusion of the revised Triggerly module permits additional automation schedules to be defined.
If you've made it this far, most of the options above are rather intuitive.
Updating Your Website
Unlike the former forms module, we now update our website with active forms once we're satisfied with our creation. We should navigate to the 'Send' panel, select our website, and send.

Pictured: Unlike the former forms module, we now update our website with active forms once we're satisfied with our creation. We should navigate to the 'Send' panel, select our website, and send.
Once sent, changes are immediately updated.
■ ■ ■
Related Form FAQs
Your website includes the most comprehensive form system in the industry. Some of the form features are listed below.
Your website includes a very large number of methods to include different types of headings, including Titles and Statements (both of which serve a specific purpose), with other shortcode and Elementor tools making the addition of various 'headings' a piece of cake. While there are any number of ways to generate page titles,… [ Learn More ]
The Fact Find form on your website contains only a few questions, and the questions asked are used to determine LVR and LMI so a PDF Report may immediately be sent to the user. During the top-of-funnel subscription process, no question should be asked, no mouse movement or scroll should be required, and no action… [ Learn More ]
In the Formly FAQ where we detailed how to create a subscription form, we introduced the concept of placeholders, or those pieces of text that are dynamically replaced with another piece of text when an email is sent. This simple feature allows you to use templated designs with dynamic user content. While the amount of… [ Learn More ]
The nonconforming business finance form was created for a single client, although it'll be made available to those that they may partner with in some way, and a 'version' of this form will be made available in the standard plugin (and client website). The form comes at a time when a very large number of… [ Learn More ]
The version 0.8.9.2 release of the Yabber website plugin includes a new for field that accepts an ABN or Company Name and returns a list of matching results. Included by default in various ways in the 202410 version of the website framework, and integrated directly into our Formly Module, the tool should be used when… [ Learn More ]
This FAQ will show you how to validate the mobile phone number associated with any subscription form on your website. If the feature is enabled, a user will be required to enter a 4-digit code that is immediately sent to the supplied mobile number. Once the correct number is supplied, the form will immediately submit… [ Learn More ]
One of the marketing magnets any Property or Finance operation will use to engage organic traffic and convert warmer traffic in higher numbers is the inclusion of a Property Report form that will result in a report provided to the user. This FAQ will introduce the Property Report and how it is applied on pages… [ Learn More ]
In most cases, the idea with any 'cold' form is to render as few fields as possible and only ask what is absolutely necessary to attract a user into your funnel. Certainly, if a user has ever subscribed to a form and comes back to your website, those fields that are known, such as name… [ Learn More ]
There are times when you would like a form to take shape as a single line. This may be useful in a website footer, inline in content, or in other locations, and the format is very different to the default line-by-line format that is applied by default for vertical forms and Simple Panels .… [ Learn More ]
The First Email is an action that will conditionally send the first email to a user after a subscription of any type based on their form interaction. The First Email sent to a user will be determined based on the nature of their subscription - are they a subscriber, phone contact, or calendar booking? A… [ Learn More ]
A Conditional Redirect is simply an action that will send a user to a different second page after subscribing to a form. The second page shown to a user will be determined based on the nature of their subscription - are they a subscriber, phone contact, or calendar booking? A single page may be used… [ Learn More ]
Your website supports a large number of our own in-house search tools that exist outside of the standard WordPress framework. This FAQ will introduce the 'BM Website Basic Search' search facility onto your website with shortcode or with the Elementor widget. Searching any website can be a nuisance, and the experience is one that can… [ Learn More ]
In a previous FAQ we looked at how to include an address validation field into a form on your website. This FAQ will introduce the same style of field that will automatically direct the user to the single page associated with each registered address in Australia. This feature is part of the broader Property… [ Learn More ]
Version 0.8.8.2 of the Yabber Website Plugin in company with website framework 202406 updates includes a basic Emergency Services search engine. The search engine will return various services based on suburb and/or postcode and then redirect the user to a dedicated page. The feature is available with a shortcode and Elementor widget - this FAQ… [ Learn More ]
The Property Property Streets API, and the Validation Endpoint in particular, is a means to access registered street and registered address location from Yabber via a form input field. The Validation (or Autocomplete) endpoints are useful for searching property on user keystrokes. The validation may be used to ensure pinpoint accuracy is assured by way… [ Learn More ]
In an FAQ titled "How to Create and Manage Website Simple Panels in Yabber" we looked at how to create Simple Panels, with the panel providing the side-by-side form and lead magnet (image or video). This FAQ will look at the various options to place the Simple Panels on your website.
Note:
A simple panel is simply a two-column form. On the left side we have a form, and on the right side we have an image or video. As you're aware, we espouse the every-page conversion methodology, and this requires a high-value and relevant lead magnet (or 'offer') on every single page of your website. Every… [ Learn More ]
Forma And Panel escalation is a component of the large Conditional Content framework that underpins your mortgage broker website and finance funnels. Basic conditional content features are introduced in an FAQ titled The Basics of Conditional Content and Interest Types, while advanced methods are addressed individually. One of the simplest conditional options to employ… [ Learn More ]
Your website forms made available in Yabber and on your website are one of the most important marketing assets in your toolkit. They're the conduit that connects your website to Yabber and triggers the applicable automation schedules, logs the lead or prospect, and provides you with relevant notifications. Integration is made with various CRM systems,… [ Learn More ]
Your website's Referral Form is a dedicated resource with its own features and automation schedule. Managed via Yabber and an Elementor block or shortcode, it may be applied anywhere on your website. It is expected that the form will be integral to your formalised referral, partner, and EDGE post-settlement/repricing programs. You will find the 'Referral… [ Learn More ]
Every page of your website requires either a form or simple panel - we know this. This FAQ will details how to assign your created forms and panels to various 'hooked' locations on your website, and how to create Custom Locations anywhere on your website with Elementor (or WordPress shortcode). Assigning forms to various locations… [ Learn More ]
A Simple Panel is a form and 'something' alongside it, such as an image or video. In this FAQ we will look at how to change the Simple Panel as shown on the front page of your website.


