This FAQ will details how to use the standard Entry and Exit modals on your website. The Modal module is quite large and includes a number of options designed specifically for the finance industry, so what we're dealing with here is how to create and maintain the 'standard' entry and exit modal as it applies to your entire website or just a specific page. We won't introduce why or how modals are used in a 'tactical' marketing environment simply because the discussion requires a dedicated video.
You should have seen a popup while you were reading the last paragraph. If you now move your mouse cursor off-screen, or aim for the back button, you'll see the same modal again. Of course, the exit modal would normally carry a very different message, but using the same modal was easier for the purpose of the demonstration. The example modal modal is incredibly simple in design, employs standard dimensions with no fancy features, and was applied only on this page.
The Modal Link: Want to see the modal via a link? Clicking on this link (created with the shortcode of [link modal="48cf67047bcae746e957872295070d58"]this link[/link]) will return the same modal. The modal link is introduced in an FAQ that introduces in the FAQ titled "How to Create and Link to a Modal in Yabber".
Modal Overview: Looking for a little background on modals? Refer to the FAQ titled "The Website Modal Overview.
Geographic & Lender Modals: This FAQ introduces the basic mechanics of entry and exit modals and doesn't discuss Geographic or Lender modals. Both these topics may be reviewing in the FAQs titled "How to Create Geographic Modals" and ."How to Create a Lender Modal" respectively.
Locating the Modal Module
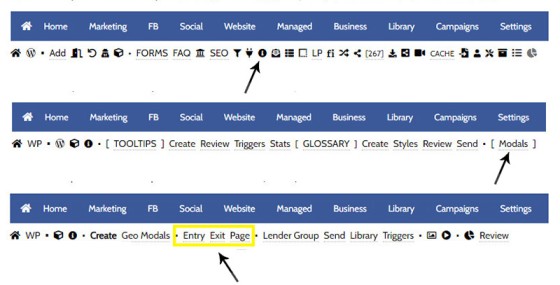
The modal module is in the 'Information' module. Select the small 'info' icon in the Website module, then select 'Modals'. The panel returned defaults to the 'Create' panel. We'll be looking at the 'Entry', 'Exit', and 'Page' panels in this article.
Pictured: The modal module is in the 'Information' module. Select the small 'info' icon in the Website module, then select 'Modals'. The panel returned defaults to the 'Create' panel. We'll be looking at the 'Entry', 'Exit', and 'Page' panels in this article.
First, we'll start with Creating a Modal (or two).
Creating the Modal
If you choose to use this feature, You should create at least one modal. The reason we say create 'at least' one modal is because modals are a conditional feature, and the modal shown to a user can be served on the basis of resolved borrowing objective... so you could theoretically create dozens of modals that'll all show based on the determined interest of the user. In reality, you'll start with just a single modal and ignore the conditional components completely.
The FAQ titled "How to Create and Link to a Modal in Yabber" will guide you through the creation of your first modal. Consider building two modals initially: one for entry and another for exit... but also consult our video discussion on modals for ideas on what content might be most suitable.
Defining the Entry and Exit Modal
When you first select the 'Entry' panel it'll appear quite confronting, and the image below will indicate as to why this is the case. However, virtually all the lower options are Conditional options that you'll likely (initially) ignore.
The Exit Modal: The process for defining an Entry and Exit modal group is the same, so you should repeat the process below for Exit modals. The only difference is that an Exit Modal does not have a 'wait time' applied.
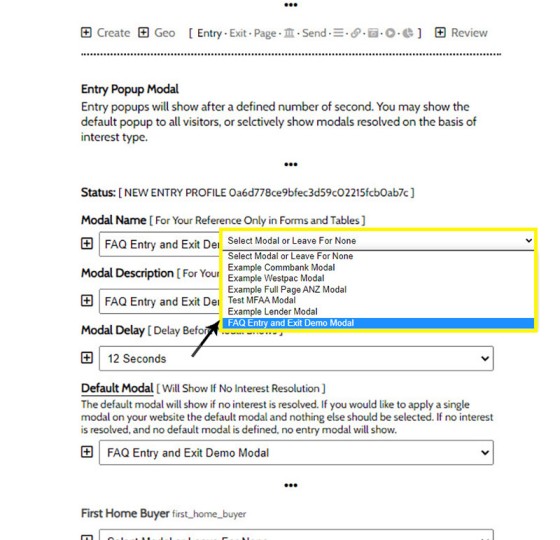
When we define an entry or exit modal, we're creating a group of modals that'll be served on the basis of borrowing objective, but at this stag it's just the default module that you'll need to define. The 'Default Modal' is indicated below by the arrow, and the only area in the panel that concerns us right now is highlighted in the yellow box - ignore everything else (it's all the conditional options).
Pictured: When we define an entry or exit modal, we're creating a group of modals that'll be served on the basis of borrowing objective, but at this stage it's just the default module that you'll need to define. The 'Default Modal' is indicated below by the arrow, and the only area of the panel that concerns us right now is highlighted in the yellow box - ignore everything else.
To make life a little less traumatic we'll show just the required fields below. You should enter a group name and description (your group at this stage will include just one modal), and we should define our Default modal. We should also select the time to wait before the modal is shown (in some cases it'll be quite quick, while in other cases it'll be minutes).
Pictured: You should enter a group name and description (your group at this stage will include just one modal), and we should define our Default modal. We should also select the time to wait before the modal is shown to the user.
Select 'Save'.
Assuming that you've done this for an entry and exit modal, we can now send this new modal profile to our website. Note that this will cause a global update, meaning that the entry and exit modal will show on every page. We've demoed an example on this page where the modal would only show on this page, and the Page Modal feature will be introduced next.
Sending Modal Data to Your Website
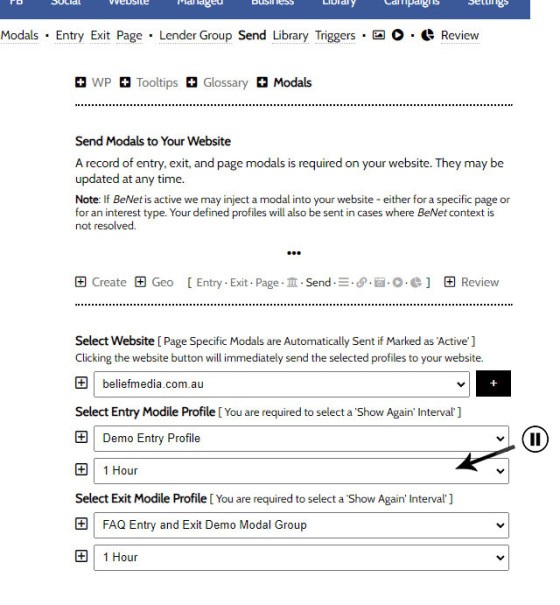
Yabber is a multi-website system so we have to select the website that'll receive our care package. Navigate your way to the 'Send' panel and you will be presented with a screen where you're able to select your Entry and Exit modal groups, and you must also define the 'Wait Time' before the same modal is shown again.
Pictured: Yabber is a multi-website system so we have to select the website that'll receive our care package. Navigate your way to the 'Send' panel and you will be presented with a screen where you're able to select your Entry and Exit modal groups, and you must also define the 'Wait Time' before the same modal is shown again.
When we send data to our website, we'll be updating the website rule package with all data of all types - this includes all active page modals, geographic modals, lender modals, and so on. We can selectively enable and disable those modals we'd like to mute or remove from the 'Review' panel (introduced shortly).
Again, the rules we've just created will force a modal on page entry and exit for each and every user on every single page, although this untargeted behaviour should be avoided. Modals should have purpose and provide value, and they should be crafted in such a way that they create additional website pathways or conversion opportunities - there has to be a good reason to use the same modal everywhere.
If you defined Conditional Modals (based on interest type), the modal you've defined will be shown to an identified user in place of your default modal.
Creating Page Modals
Page modals make more sense because they're targeted specifically to specific content in very specific areas of your website. Your First Home Buyer page, for example, doesn't necessarily need conditional resolution because we can make a safe assumption that the content a user is interested in reading relates to the content on the specific page they're browsing. The same assumption applies for Refinancing, Investment Finance, and so on.
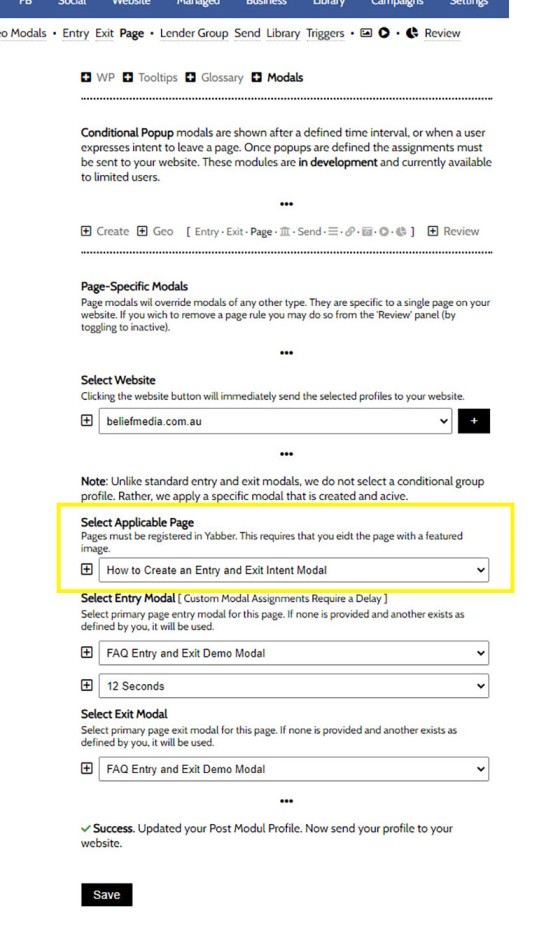
We're going to look at the method we used to create the modal on this page. We'll use the modal we created earlier. Select the 'Page' panel and a select menu will be returned where you're required to select the applicable website. Selecting your website returns a number of options relating to the modal that'll be shown on the selected page (highlighted in yellow).
Pictured: Select the 'Page' panel and a select menu will be returned where you're required to select the applicable website. Selecting your website returns a number of options relating to the modal that'll be shown on the selected page (highlighted in yellow).
You should select the optional entry and optional exit modal and apply the time interval that'll be applied before the same modal is shown again. Select 'Save'. Once saved, we are required to update our website with the new rules, so assuming you're ready for the changes to take effect, you should navigate back to the 'Send' panel and update as we did previously.
Note that you are not required to select a global entry and/or exit modal (or a modal shown on entry or exit to a page). If you don't want to use global modals, leave the primary option blank when sending to your website. However, updating here will send all active page rules to your website.
A page modal will always be evaluated before a global modal, Geographic modal , or Lender Modal. The assumption is that the Page Modal is an important part of the page architecture and functions to amplify the effectiveness of conversion methods applied to that specific page.
Modals on Landing Pages
Exit modals are important on any Landing Page. We invest time and money into driving traffic into a conversion funnel, so we don't want to lose a potential lead because the page we've delivered isn't entirely appropriate. The modal is one last effort to drive the conversion or contact. Reference should be made to our video discussion on the topic in order to undestand how and when Landing Page modals should be used.
Reviewing and Editing Modal Groups and Content
You may review and edit all your modal data from the 'Review' panel. The Entry and Exit groups will include all the sub-modals assigned for the various interest types, and you may selectively enable and disable any of the conditional interest-based modals. It's an advanced feature so don't get too hung up on it just yet. The point is that you have complete control over how, when, and where modals are shown to a user level.
Pictured: You may review and edit all your modal data from the 'Review' panel. The Entry and Exit groups will include all the sub-modals assigned for the various interest types, and you may selectively enable and disable any of the conditional interest-based modals. It's an advanced feature so don't get too hung up on it just yet. The point is that you have complete control over how, when, and where modals are shown to a user level.
Select the 'Edit' icon in the Entry and Exit tables to edit the applicable group.
Any modal, group, or other feature that is disabled via the toggle switch will not be sent to your website with an update.
Modal Triggers and Statistics
Modal interactions are recorded to the user-level, so we're fully appraised of their performance and the impact they have on our conversions. Don't rely on guesswork! Aggregated stats are returned in the table but it's the hourly, daily, and other stats that tend to paint a bigger picture. Paired with page views, conversion data, and pathway assets, we're able to definitively determine exactly how our modals are performing.
Because the modal interaction is tracked to a user (assuming the user is known), we may apply various triggers on modal interactions to enhance the effectives of the marketing funnel (as you're well aware, integrated triggers on all your marketing assets are an essential component and defining feature of a good funnel).
Modals are an integral part of any higher-yield funnel, and our video discussion with details why this is the case (conversion data doesn't lie). Modal triggers are introduced in and FAQ titled "How to Create, Manage, and Use Modal Triggers :.
■ ■ ■
Related Modal FAQs
Website Modals are a big topic, and your website includes dozens of modal features. The following FAQs should be referenced for various Modal tools.
Your website includes a very large number of methods to include different types of headings, including Titles and Statements (both of which serve a specific purpose), with other shortcode and Elementor tools making the addition of various 'headings' a piece of cake. While there are any number of ways to generate page titles,… [ Learn More ]
The trigger system in Yabber is detailed in an FAQ titled "How To Create Marketing Triggers". It details how to create email, website, webpage, video and range of other triggers within your marketing funnel. Yabber - supported by a conditional framework that is ridiculously powerful - might be considered a Trigger-focused marketing system… [ Learn More ]
An inline frame (iframe) is a HTML element that loads another HTML page within the document. It essentially puts another webpage within the parent page. The modal link we're about to describe loads a very simple modal and then loads the content of another page within that iframe. Because it's a feature that's rarely used,… [ Learn More ]
in a previous FAQ we introduced how to include calculators on a page with Elementor or Shortcode. The problem is that they don't look real good. As part of the linking architecture, the [link] shortcode provides for a fully trackable popup modal, meaning that you can include multiple calculator links on a single page.… [ Learn More ]
In this FAQ we'll provide the basic shortcode necessary to return a video modal to your page. There are two methods for returning a video modal: a Yabber modal, and a full screen modal, with the former preferred because it is fully tracked and integrated with the Conditional Framework.
Modal Module Overview:
Your website… [ Learn More ]In an FAQ titled How to Define and Send Lender-Specific Videos for the Lenders Archive and Product Pages we looked at how to assign videos to the Lender Product Archive and Pages on your website. Familiarity with the former module is required, as this FAQ will simply show you how to link directly… [ Learn More ]
Your website modal module is the most sophisticated in the industry, and one of the most powerful systems created for any industry. A large number of FAQs reference how the modal system functions, with most of the functionality focused on entry and exit modals, with the modal resolved by your preference, interest or resolved borrowing… [ Learn More ]
The Modal Module made available in Yabber is an incredibly powerful feature that provides enormous flexibility in how and when we interrupt the funnel in order to provide appropriate course correction. The system is supplemented by a linking feature that permits you to link directly to any modal manicured within the system. In order to… [ Learn More ]
Lender Modals are popups shown based on the lender pages on your website. Each lender is assigned to a 'Lender Group' with a group consisting of a single lender or multiple lenders, and the defined modal will show when a user visits the specific lender archive product pages on your website. A default lender… [ Learn More ]
In a previous FAQ we look at how to create and manage "Entry and Exit Intent Modals" for Your Entire Website or a Single Page. The system defined modals that will shown on your website after a defined number of seconds, or when the user indicates intent to leave the page. In this FAQ… [ Learn More ]
This FAQ will details how to use the standard Entry and Exit modals on your website. The Modal module is quite large and includes a number of options designed specifically for the finance industry, so what we're dealing with here is how to create and maintain the 'standard' entry and exit modal as it applies… [ Learn More ]
An FAQ titled "The Website Modal Overview" introduces the modal module in Yabber and on your website. This FAQ will show you how to create a standard and full screen modal, while other FAQs will discuss how the modal system functions in more advanced funnel-centric ways. The most basic way to reference a modal… [ Learn More ]
The Yabber modal options made available on your website are extremely extensive. This FAQ merely provides a fairly broad modal overview that will direct you to an appropriate resource based on the type of modal feature you would like on your website.
What is a Modal?
A modal is just a popup. Click on
Your Media Library will invariably populate itself with PDF documents 0 not entirely ideal for website viewing. The PDF Modal, however, presents the opportunity to share our PDF material in a unique way, track it, and action triggers on the basis of a user interacting with the asset (although the latter is quite advanced). You… [ Learn More ]
Conditional Content FAQs
The Conditional content module is significant. The FAQs listed below may exclude some of the basic conditional features, such as some of the Front Page conditional blocks.
Your website includes a very large number of methods to include different types of headings, including Titles and Statements (both of which serve a specific purpose), with other shortcode and Elementor tools making the addition of various 'headings' a piece of cake. While there are any number of ways to generate page titles,… [ Learn More ]
The First Email is an action that will conditionally send the first email to a user after a subscription of any type based on their form interaction. The First Email sent to a user will be determined based on the nature of their subscription - are they a subscriber, phone contact, or calendar booking? A… [ Learn More ]
The Conditional Content Blocks arguably the more effective method of rendering blocks of conditional content. The 'Blocks' module introduced similar functionality to what we're about to described, but if you're starting with Conditional Content, we'd suggest you use this module rather than Blocks simply because of the ease a single page may be assigned… [ Learn More ]
Conditional Content is one of the defining features of your website framework. Despite the fact the Conditional Content blocks are often avoided because of the perceived complexity, they seriously amplify the effectiveness of any organic or promoted funnel. We appreciate that many brokers just 'want a website', and that's find, but if and when the… [ Learn More ]
We generally advocate for brokers to position themselves in various ways by way of standalone websites that have a defined siloed audience and serve a very specific purpose. However, managing multiple websites can be problematic for a number of reasons, with duplicate content and time requirements probably topping the list. If managed correctly - and… [ Learn More ]
You want those marketing assets on the periphery to property represent your brand, but you also want them to be consistent with your trending website traffic or consumer sentiment. For example, with the introduction of a FHB or Investor incentive of some kind you will likely want your broader marketing footprint to reflect this, or… [ Learn More ]
You want those marketing assets on the periphery to property represent your brand, but you also want them to be consistent with your trending website traffic or consumer sentiment. For example, with the introduction of a FHB or Investor incentive of some kind you will likely want your broader marketing footprint to reflect this, or… [ Learn More ]
It's typical to change your social media banners of all types based on seasons, such as Christmas, Anzac Day, Easter or similar. A module in Yabber permits you to define start and stop dates for a specific banner, and that banner will automatically be applied (and later replaced with your 'default' banner). This FAQ shows… [ Learn More ]
Conditional Content is content that is delivered to a user based on resolved borrowing objective, occupation, campaign links, or interest. In the property field the Interest might be a particular type of property or a category of buyer. Supported by BeNet, the use of Conditional Content must be considered an advanced feature, although those… [ Learn More ]
Almost without question, BeNet is the single most sophisticated AI made available in the finance industry. For all intents and purposes, it has to be considered to be an extremely knowledgeable mortgage broker with an expert understanding of digital marketing, processes, systems, policies, property, finance, best practice, and your marketing efforts. BeNet is connected to… [ Learn More ]
In a previous FAQ we look at how to create and manage "Entry and Exit Intent Modals" for Your Entire Website or a Single Page. The system defined modals that will shown on your website after a defined number of seconds, or when the user indicates intent to leave the page. In this FAQ… [ Learn More ]
This FAQ will details how to use the standard Entry and Exit modals on your website. The Modal module is quite large and includes a number of options designed specifically for the finance industry, so what we're dealing with here is how to create and maintain the 'standard' entry and exit modal as it applies… [ Learn More ]
Resulting from various State-level Government incentives and fees, one of the areas that differs significantly from state-to-state is the purchase of a first home. The FHB Panel is one of the simplest conditional features of any type to use because it serves content that is resolved by State - not interest, which is the typical… [ Learn More ]
Conditional Content is content that is delivered to a user based on resolved borrowing objective, occupation, campaign links, or interest. Your website is a shape-shifting chameleon in that it delivers different content to different users in order to maintain higher levels of engagement and ultimately convert more clients. Conditional features are designed to amplify the… [ Learn More ]
Forma And Panel escalation is a component of the large Conditional Content framework that underpins your mortgage broker website and finance funnels. Basic conditional content features are introduced in an FAQ titled The Basics of Conditional Content and Interest Types, while advanced methods are addressed individually. One of the simplest conditional options to employ… [ Learn More ]


