The Lender Widgets on your website are one of your most powerful website features. Despite the ubiquitous industry rhetoric suggesting that sharing rates will only attract 'rate chasers' (partially true, but outside the scope of this FAQ), the rate information shared on your website will objectively attract and convert more mortgage clients. Used in company with other Lender Rate features, your powerful website presence will quickly establish you with the expertise and authoritativeness necessary to gain the trust of your website visitors. We are obligated to share the information that clients are looking for, and lender data will take us part where there in achieving this objective. Lender Rate data is central to your website presence and a defining characteristic of your digital footprint. Assuming you attract clients to your website, the data will convert more clients.
Elementor Lender Widgets: This FAQ will details how to create and manage lender widgets almost entirely in Yabber. You may also create the widgets from within Elementor exclusively. The method is introduced in an article titled "How to Use and Manage Lender Widgets on Your Website with Elementor".
Lender Rate Widgets are shown everywhere in what is normally blocks of four, although they can be used individually or in any manner of your choosing.
Lender Widgets are a Big Topic
Lender Widgets are a big topic and a single FAQ won't cover the vast array of options. This FAQ will cover how to manage Lender Widgets wholly within Yabber, while other FAQs will introduce how the Widgets may be used with Elementor or shortcode.
Pictured: You will find the Lender Widget panels by following the Lender icon in the Website module. Select the 'Widgets' menu item.
When your website is shipped, the Widgets are defined entirely in Elementor, meaning that - with the exception of styling - you will have no control over what data is shown in each Widget. If you choose to migrate control of your widgets to Yabber, you will be required to alter each Widget on your website in the manner we're about to describe.
Note that the Yabber features currently only support Residential Lending. Yabber integration for other widget types, such as those for Business, Equipment, Margin, Personal, Transaction, Credit Card, and other product types are pending, so these other product types need to be managed within Elementor. All these other Widget types will be available in the Related FAQs listed at the bottom of this page.
Website Widget Defaults are Satisfactory: When your website is delivered the Lender Widgets are all defined based on a best-practice common standard. There is generally no need to change them unless required, and altering the individual widgets with Elementor is generally an easier option that takes no more than a few seconds. It is expected, however, that you create and send a default style to your website.
The Result
The result of the Lender Widgets is as follows (shown in a block of four as it appears on your front page).
Pictured: Lender Widgets are presented in a four-column block on your website's front page. Every aspect of the Widget may be defined by you - this includes style, lenders, product types, and rate type. In this FAQ, we'll look at how theses attributes are defined and managed entirely in Yabber.
Each of the products listed in the Widget will link to the applicable product page. Needless to say, the data will always be up-to-date, and it will always source only your accredited lenders.
Lender Widget Structure
When a Lender Widget is created in Yabber, it is comprised of three primary components:
- The Style Applied to the Widget.
- The Lenders evaluated as part of the query.
- The Lender Profile (includes repayment types, sorting, loan purpose, rate type, and so on - all defined for each single panel).
We'll look at the three parts to each 'Widget Profile', and we'll then send that data to our website and create a Widget asset that is maintained from within Yabber.
Create a Widget Profile
The Widget Profile should be self evident. You should create a descriptive name for your reference, and then define each of the options as required. Consideration should be made to the Lenders that will be associated with the profile.
Pictured: The Lender Profile should be self evident. You should create a descriptive name for your reference, and then define each of the options as required. Consideration should be made to the Lenders that will be associated with the profile.
There is no limit to the number of Lender Widget Profiles that you will create. In fact, it's not uncommon for some brokers to have over 30.
Create a Lender Profile
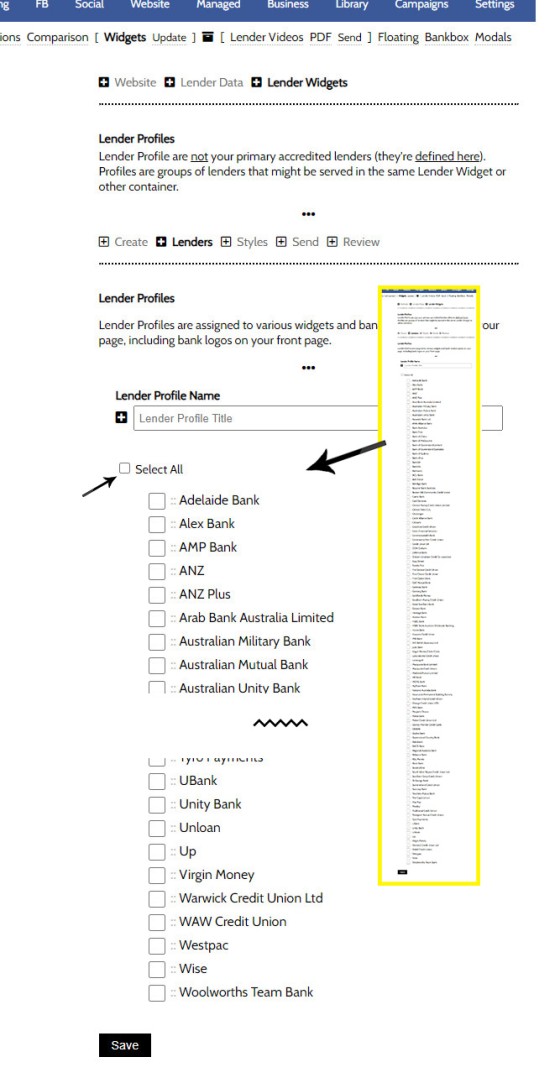
Lender groups are groups of lenders that will applied to any single Widget. It's expected that you'll create one lender profile where all lenders are grouped, but you will create others with lenders that share commonalities, risk profiles or product types. You might also create a profile called 'Big Banks' - this is a profile we apply to your website on delivery by default.
Pictured: It's expected that you'll create one lender profile where all lenders are grouped, but you will create others with lenders that share commonalities, risk profiles or product types.
Ensure that you give each Lender Group an easily identifiable name - this will be listed in assignment forms.
Creating Lender Widget Styles
First, it is generally required that you create at least one default style that is referenced when no other profile is defined. Other styles might be defined for a specific purpose, such as Green Home Loans or other product types, such as Business, Margin, or Personal Finance (while the Lender Widgets are applied in Yabber, the styles are all available globally in Elementor).
Pictured: It is generally required that you create at least one default style that is referenced when no other profile is defined. Other styles might be defined for a specific purpose, such as Green Home Loans or other product types, such as Business, Margin, or Personal Finance. Every single element of the widget may be styled to your liking.
Every single element of the widget may be styled to be consistent with your brand or preference.
Sending Lender Widget Profiles to Your Website
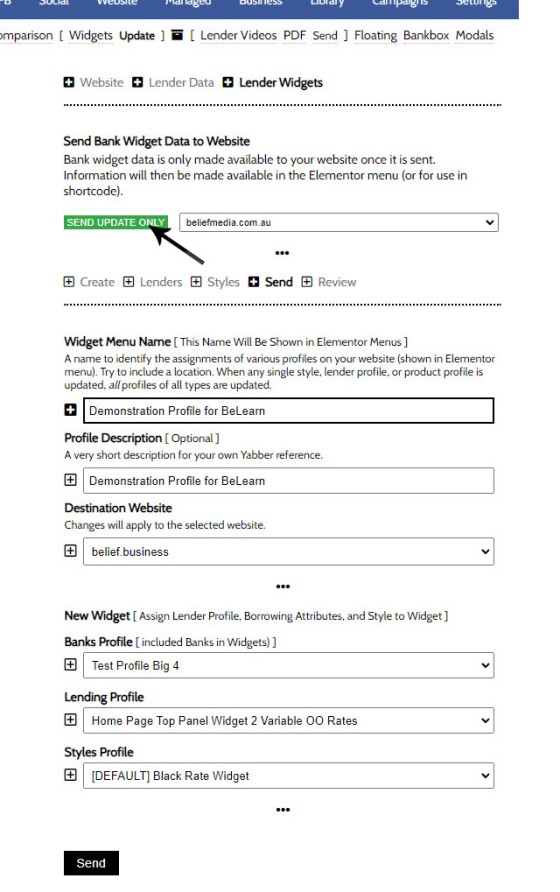
Once your various profiles are created, we can 'merge' the three elements into a single profile and send our final Widget Profile to our website. We should navigate to the 'Send' panel and give our Widget Profile a name, remembering that the profile is a combination of the product characteristics, lenders, and style.
Pictured: Once your various profiles are created, we can 'merge' the three elements into a single profile and send our final Widget Profile to our website. We should navigate to the 'Send' panel and give our Widget Profile a name, remembering that the profile is a combination of the product characteristics, lenders, and style.
In the above screenshot, you can see how we create a 'combination profile'. We mix-and-match each of the profiles in such a way that each of our Widgets tells a unique story. We'll send an example now to our website made up a lender profile that includes Owner Occupied rates for just the big-4 lenders.
Update Only: It's quite possible that you will never create a Widget Profile in Yabber, but you will almost always create at least one style. The option towards the top of the page will update your website with data without sending a complete Widget profile. If you're creating just a default style, this is how you will update your website when changes are made.
Now we've sent this Widget profile to our website we can place it with Elementor.
Placing a Yabber-Created Lender Widget Profile With Elementor
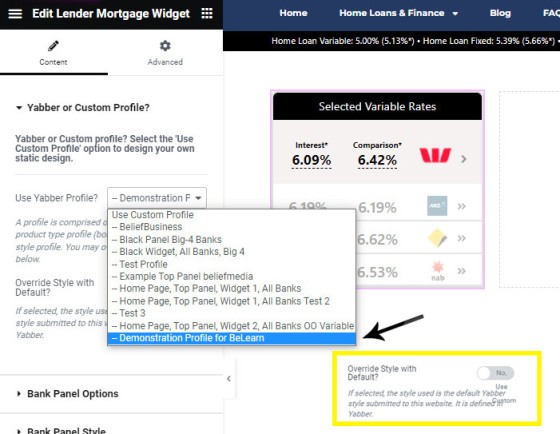
When placing a Yabber-defined Widget onto your website, you should first locate the 'Lender Mortgage Widget  ' and drag it into your post or page. From the 'Use Yabber Profile?' select menu, we should select the Profile we've just built. The result is returned to your page.
Pictured: Locate the 'Lender Mortgage Widget' and drag it into your post or page. From the 'Use Yabber Profile?' select menu, we should select the Profile we've just built. The result is returned to your page.
Using Yabber Default Style: Shown as an inset to the bottom right of the above image you'll see a 'Override Style with Default' option. This will force your default Widget styles to be applied, and it will override the style defined for this specific widget.
Updating a Yabber-Defined Lender Widget
Now you have placed a Yabber-defined Lender Widget on your website, you won't ever need to log into WordPress (or use Elementor) to alter the style or data returned. From Yabber's 'Review Panel' (pictured shortly), you will simply select the Profile (made up of a style, lender profile, and lending profile) and assign a new set of values to the Profile. When updated on your website the Lender Widget will show the new data.
Reviewing and Editing Data
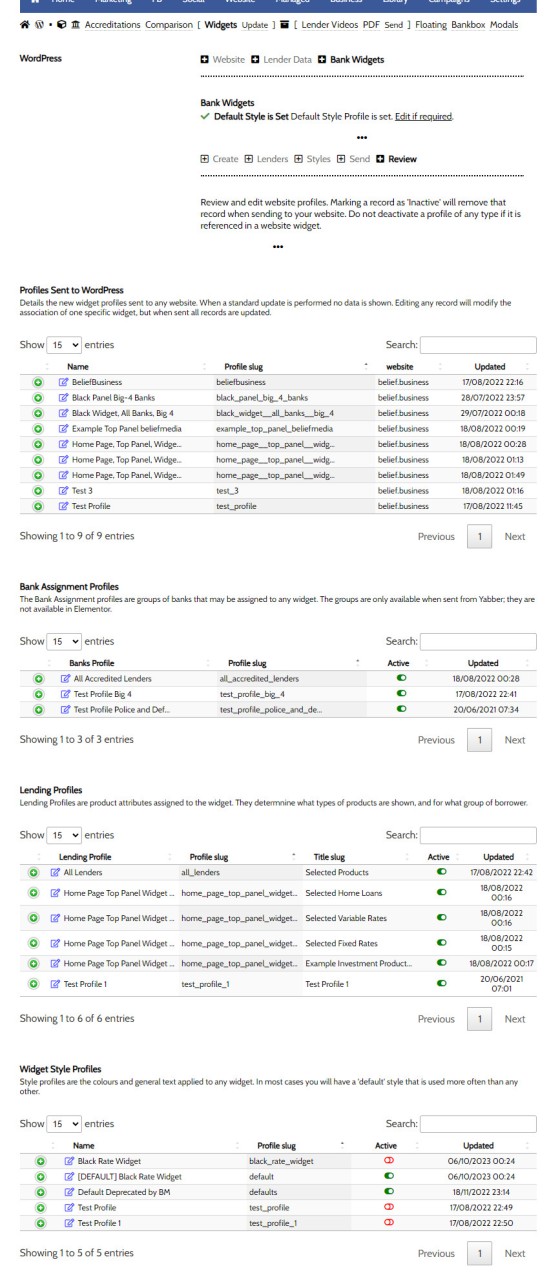
The 'Review' panel provides a full and complete summary of your various profiles and styles. To edit any asset, select the 'Edit' icon. To review the data, select the green accordion button. To alter the Profile sent to your website, select the edit icon associated with the Widget Profile record in the 'Profiles Sent to Website' table (you will then assign and save new values).
Pictured: The 'Review' panel provides a full and complete summary of your various profiles and styles. To edit any asset, select the 'Edit' icon. To review the data, select the green accordion button. To alter the Profile sent to your website, select the edit icon associated with the Widget Profile record in the 'Profiles Sent to Website' table.
■ ■ ■
Related Lender Data FAQs
Related FAQs and features relating to Lender Data. The Lender features tends to touch most modules, so only primary FAQ modules are shown.
One of the features of Yabber that is less visible than others is the lender rate email signature. The signature is an image that may be used in an email signature to return the lowest rate of a specific type. Yabber provides links to the direct image and will also create a HTML link for… [ Learn More ]
All rate data returned via Yabber will automatically segregate the requested 'standard' products from those 'conditional' products, such as green finance or leveraged residential lending against a business product. In all cases where we've had feedback from users and the validity of rates was questioned, the product has existed and was entirely valid, but the… [ Learn More ]
In an FAQ titled How to Define and Send Lender-Specific Videos for the Lenders Archive and Product Pages we looked at how to assign videos to the Lender Product Archive and Pages on your website. Familiarity with the former module is required, as this FAQ will simply show you how to link directly… [ Learn More ]
In a previous FAQ we introduced how to define the single video for your website Lender Archive page. However, this is the top-level entry page that effectively acts as a conduit to the Lenders Archive Pages and the thousands of Lender Product Pages. Each of the specific Lender Archive Pages, and all of… [ Learn More ]
The Lender Archive Video is a single video shown on the entry Lender Archive Page. It is important for the purpose of amplifying funnel enthusiasm and introducing your website visitors to the purpose of the vast information archives you make available. The video should always include an appropriate call-to-action, appropriate disclaimers, and other helpful… [ Learn More ]
We've said it over and over again, but we'll say it again regardless. You don't want to be a rate-driven broker, and you don't want to attract rate-focused mortgage customers. However, that doesn't mean that we selectively deliver self-serving information on our website or in the funnel at the expense of the information that well… [ Learn More ]
There are a couple of dozen different ways to show Lender Data on your website, and the floating Lender Panel is just another one of them. The panel is also a feature that you're not likely to use. We'll often say that we have to serve information on our website that the consumer wants and… [ Learn More ]
The Modal Module made available in Yabber is an incredibly powerful feature that provides enormous flexibility in how and when we interrupt the funnel in order to provide appropriate course correction. The system is supplemented by a linking feature that permits you to link directly to any modal manicured within the system. In order to… [ Learn More ]
Lender Modals are popups shown based on the lender pages on your website. Each lender is assigned to a 'Lender Group' with a group consisting of a single lender or multiple lenders, and the defined modal will show when a user visits the specific lender archive product pages on your website. A default lender… [ Learn More ]
The inclusion of transactional account data on your website is important because it's part of a mortgage product that a consumer will interact with every single day. In terms of our compliance obligations, only those transactional accounts that are associated with lender products may be shown, and this effectively includes every transactional account made available… [ Learn More ]
Business Finance is an important part of your business model, and the lending is a gateway loan into typical residential lending. The business finance products made available on your website are sourced from your accredited lenders. This FAQ will details how to include a Business Finance Lender Widget anywhere on your website.
Business Finance Widget… [ Learn More ]
Personal Loans are a getaway into other types of lending, so it's something that your business shouldn't ignore. It's a common type of finance that is widely used, and one that takes very little time to process. Your website includes various pages for personal vehicle, maritime, motorcycle, caravan, aircraft, and other types of specific assets,… [ Learn More ]
Margin lending is a type of loan that allows you to borrow money to invest, by using your existing shares, managed funds and/or cash as security. It is a type of gearing, which is borrowing money to invest.
Compliance We've consulted with ASIC to determine if it's acceptable from a compliance perspective to include details… [ Learn More ]
Despite the ubiquitous industry rhetoric suggesting that sharing rates on your website will only attract 'rate chasers' (partially true, but outside the scope of this FAQ), the rate information shared on your website will objectively attract and convert more mortgage clients. Used in company with other Lender Rate features, your powerful website presence will quickly… [ Learn More ]
Despite the ubiquitous industry rhetoric suggesting that sharing rates on your website will only attract 'rate chasers' (partially true, but outside the scope of this FAQ), the rate information shared on your website will objectively attract and convert more mortgage clients. Used in company with other Lender Rate features, your powerful website presence will quickly… [ Learn More ]
A number of FAQs make reference to 'Lowest Rate Placeholders'. Placeholders are a string of text that is replaced in many blocks of text with the lowest available rate of a specific type from your accredited lenders. The placeholders shown below are in no way definitive - in fact, they're just one style of placeholder,… [ Learn More ]
The Lender Widgets on your website are one of your most powerful website features. Despite the ubiquitous industry rhetoric suggesting that sharing rates will only attract 'rate chasers' (partially true, but outside the scope of this FAQ), the rate information shared on your website will objectively attract and convert more mortgage clients. Used in company… [ Learn More ]
Quite frankly, the Lender Archive Page link shortcode is rather pointless because the standard link shortcode is arguably more effective. The reason it exists is because we have other plans for how the shortcode is to be used. So, if you're linking to a specific lender archive, such as that for the Commonwealth Bank  ,… [ Learn More ]
The Lender Widgets on your website are one of your most powerful website features. Despite the ubiquitous industry rhetoric suggesting that sharing rates will only attract 'rate chasers' (partially true, but outside the scope of this FAQ), the rate information shared on your website will objectively attract and convert more mortgage clients. Used in company… [ Learn More ]
The Lender Library is an unusual page. It was once a hidden page on broker websites that was used almost exclusively by brokers. It has since become a standard public page within the website framework. The article in our blog titled "Mortgage Broker Lender Document and Media API, and Lender Documents Elementor Block" should be… [ Learn More ]
In order to represent your panel of lenders on your website, most brokers will use a silly slider of static images, and others will use a single fixed image comprised of multiple images - just a lazy solution. Your website includes a grid of images that links to the application Lender Archive Page that'll… [ Learn More ]
The Featured Product panel is a means to provide an array of information on a single product. The information may be shaped in numerous formats which is guided by the Elementor plugin options. As is expected from any finance professional, the rate data (and other product data) is always maintained to reflect the current rate.… [ Learn More ]
Like it or not (and most brokers don't), rates play a huge part in attracting the early attention of your website visitors. You will attract more traffic and you will attract more clients. What you do next will unlikely be rate focused, but our early efforts should be focused on creating conversations.
Note:
This FAQ provides… [ Learn More ]The Featured Rates Panel is one of nearly 30 tools used to render lender data and comparison information, and it is one of two panels used to return 'Featured' rate data in a manner similar to that which we're about to describe. The 'other' featured rate panel' is somewhat of a legacy Elementor-only feature.… [ Learn More ]
There's a Rate Ribbon on the front page of your website below the centre-fold block that presents the lowest rates of various types. The purpose of the ribbon is to position yourself as a broker, showcase your digital expertise, and create early funnel pathways. Each rate shown in the ribbon links to the relevant 
The single line rate bar is shown on the broker website framework by default as part of the header and in the centre of the front page. The purpose is to position yourself as a broker, differentiate yourself from the 'others', showcase lowest available rates from your accredited lenders, and create website pathways. This FAQ… [ Learn More ]
The Published versus Comparison Rate graph was created to support a single FAQ on 'What is a Comparison Rate', but the graph often finds value elsewhere. To include the graph on your page, use the shortcode of [comparison_interest_faq]. The Result:
The graph simply illustrates how the published rate is often vastly different to the… [ Learn More ]
There are times where you will need to return the current cash rate into your website (often in your website footer as a quick reference). The shortcode of [bm_cashrate] will return 4.35% (bolding is ours). Simple. Note that the current cash rate is always shown in the header of your website. This panel links to… [ Learn More ]
All queries to lender data is measured against your accredited lenders. Once our accredited lenders are defined in Yabber, all queries from each of your specific websites will only return data from those lenders as defined in Yabber. Lenders are added to the system regularly and data is generally updated daily. Access the Lender Data… [ Learn More ]


