Microsoft Azure is described as "an ever-expanding set of cloud services to help your organisation meet your business challenges. It is the freedom to build, manage and deploy applications on a massive, global network using your favourite tools and frameworks." So, Azure is a cloud-based hosting and application backend that supports small business through to fortune-500 companies.
This FAQ will show you how to set up a Microsoft application within Azure to support your Yabber and personal marketing applications.
Competitive Advantage: The connectivity between your Microsoft systems and Yabber put you at a clear competitive advantage in terms of your marketing efforts and business systems. Most of your competitors are operating with numerous systems bolted together and held together by metaphorical string, while your systems are wholly integrated and fully compliant. Your integration allows for scalability, agility, and a compliance firewall. While every other solution you have seen is nothing more than third-rate technical debt, your systems are absolutely industry leading.
January 2026: The application process changes from time-to-time, as does the required application permissions. This FAQ was last updated in January 2026.
What is Microsoft Graph?
Microsoft Graph is a Microsoft developer platform that connects multiple services and devices. Initially released in 2015, the Microsoft Graph builds on Office 365 APIs and allows developers to integrate their services with Microsoft products, including Windows, Office 365, and Azure. We use Microsoft Graph extensively to integrate your calendar functionality, email, tasks, and OneDrive (Cloud Storage), OneNote, Planner, and other features directly into your marketing applications. It is by using your own Microsoft application (or ours, on occasions) that we’re able to easily integrate your own calendar on landing pages without the need for those pesky third-party plugins (what your misguided competition are using).
The DIY Option
Creating an application may often by problematic if performed by us. It requires the exchange of administrator passwords and global access, and most accounts are protected via two-factor authentication making our access a nuisance. For this reason, some of our less-expensive plans include the option to create the Microsoft application yourself - a far quicker option. Certainly, if you're updating your Secret Value (after the application has expired and thus muting connectivity), it's an easy option to update yourself.
If we complete your application, it will be performed over the phone, and we will take control of your screen through Microsoft Teams.
Why Register Your Own Application?
While our system is set up to support your connectivity to our Microsoft Application, we simply prefer that you take ownership of the product and have it fully branded in your name as a real company asset. Once you have your own application you’re not limited by permission issues that arise from third-party applications (or those owned by us), you’re not committed to Yabber for any tool you might use in the future, and you have the potential to have your own clients connect to your own branded tools.
The GoGaddy Problem
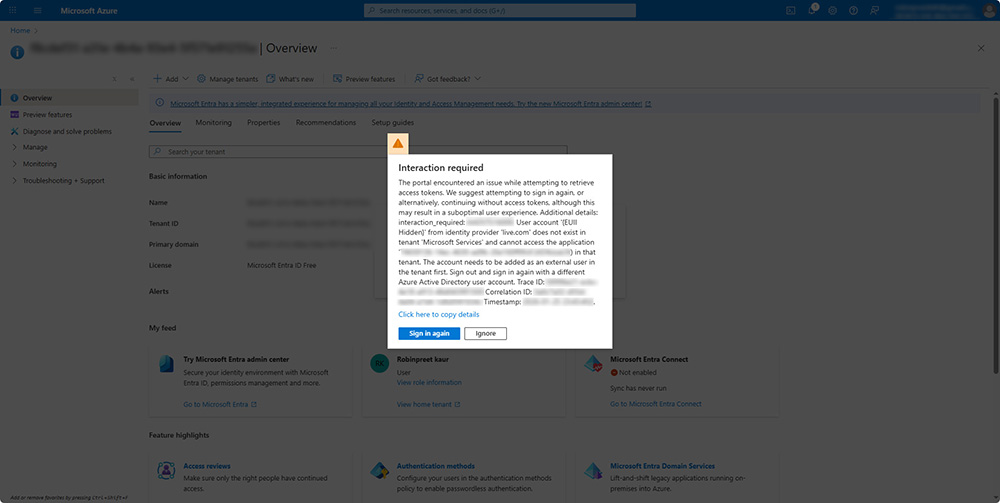
We always recommend signing up for your Microsoft subscription directly through Microsoft and not third-party providers - notably GoDaddy. Creating an application through your native Microsoft account is a straight-forward process. GoDaddy, however, provides significant roadblocks  that increases application complexity, and it will be a far more problematic and time-consuming process. While the GoDaddy backend looks like Microsoft, it is essentially owned by GoDaddy. You cannot create or activate an Azure tenant, access Azure Entra ID properly, register applications, create app secrets or certificates, create or attach Azure subscriptions, grant application admin or global admin for Azure, enable Graph API permissions, or control tenant-wide authentication flows. Signing up for email through GoDaddy is an uninformed retail push that competes directly with best business outcomes (they also offer less storage space).
If you've signed up with GoDaddy email, we need to jump through a number of hurdles... and it won't be pretty.
GoDaddy Solutions: An FAQ titled "How Do I Migrated GoDaddy Microsoft Email Directly to Microsoft?" details what steps are necessary before an application may be created. If you're able to log into Azure you don't have problems... but this is unlikely. GoDaddy intentionally lock down your access to essential peripheral services.
Creating the Microsoft Application
If you encounter any issues while building your application, please call us. A screen share is usually the most efficient means of completing the process in just a few minutes.
At the end of this process we'll be required to update Yabber with an Application (Client) ID, API Value, and Tenant ID.
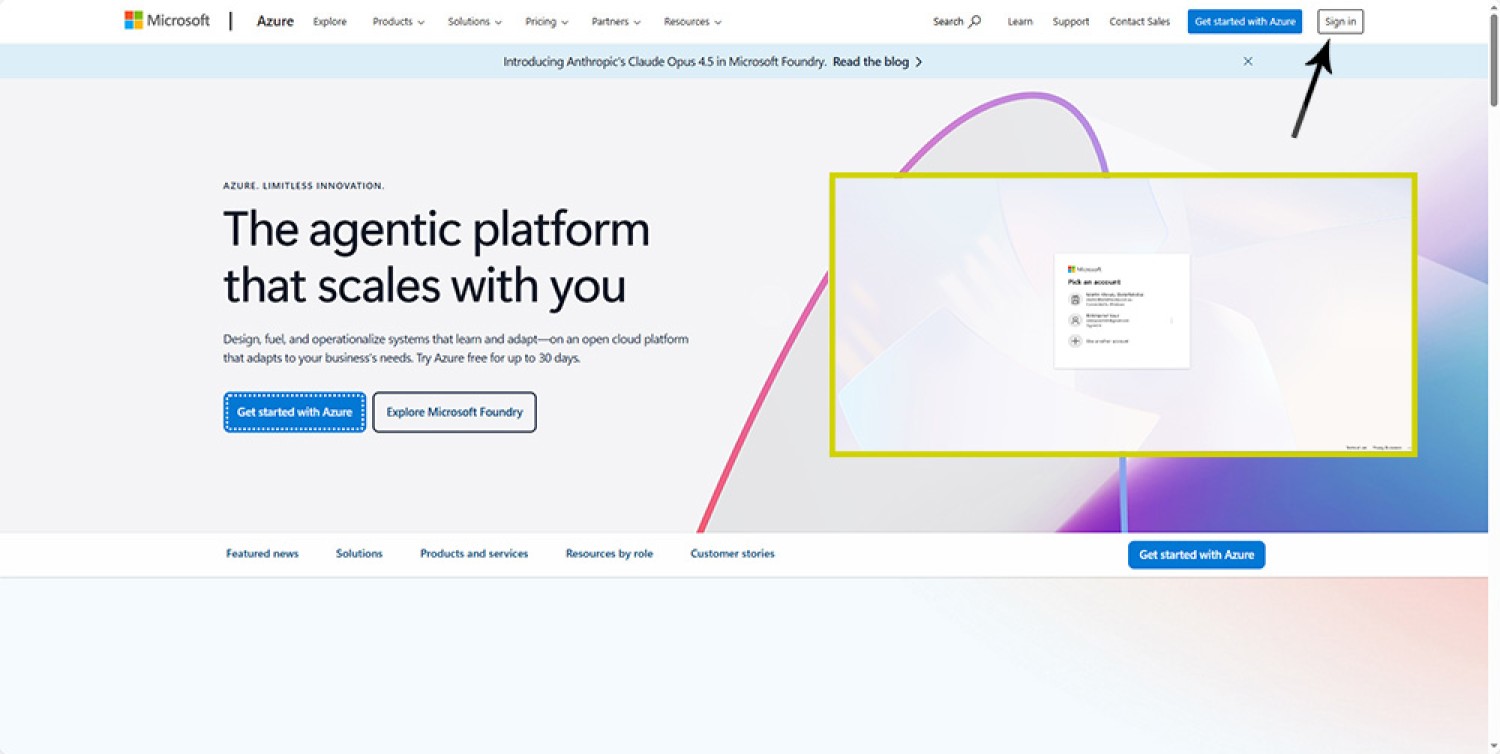
1. Log into portal.azure.com
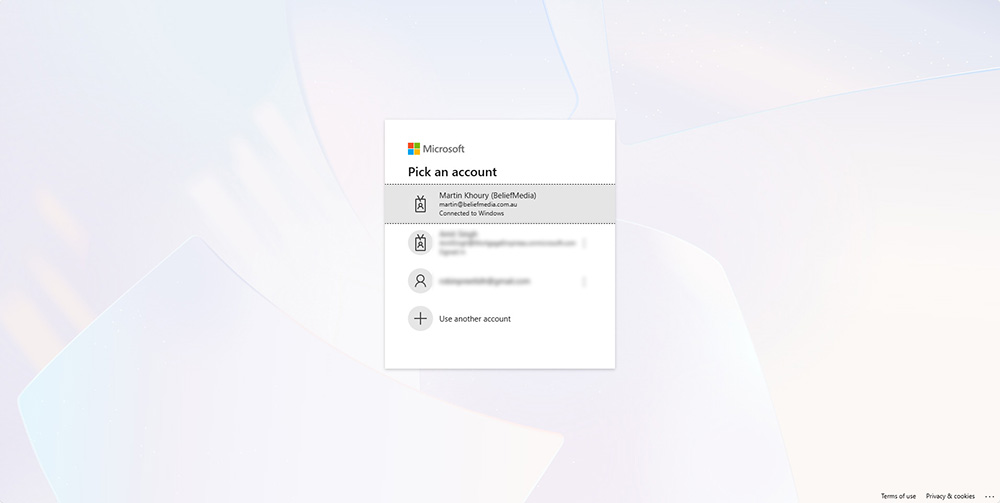
You'll need an administrator MS365 Business email account. First, log into portal.azure.com  .If we're building the application on your behalf, please check your login before supplying us with credentials. Sign in with your MS365 administrator credentials.
2. Azure Welcome Screen
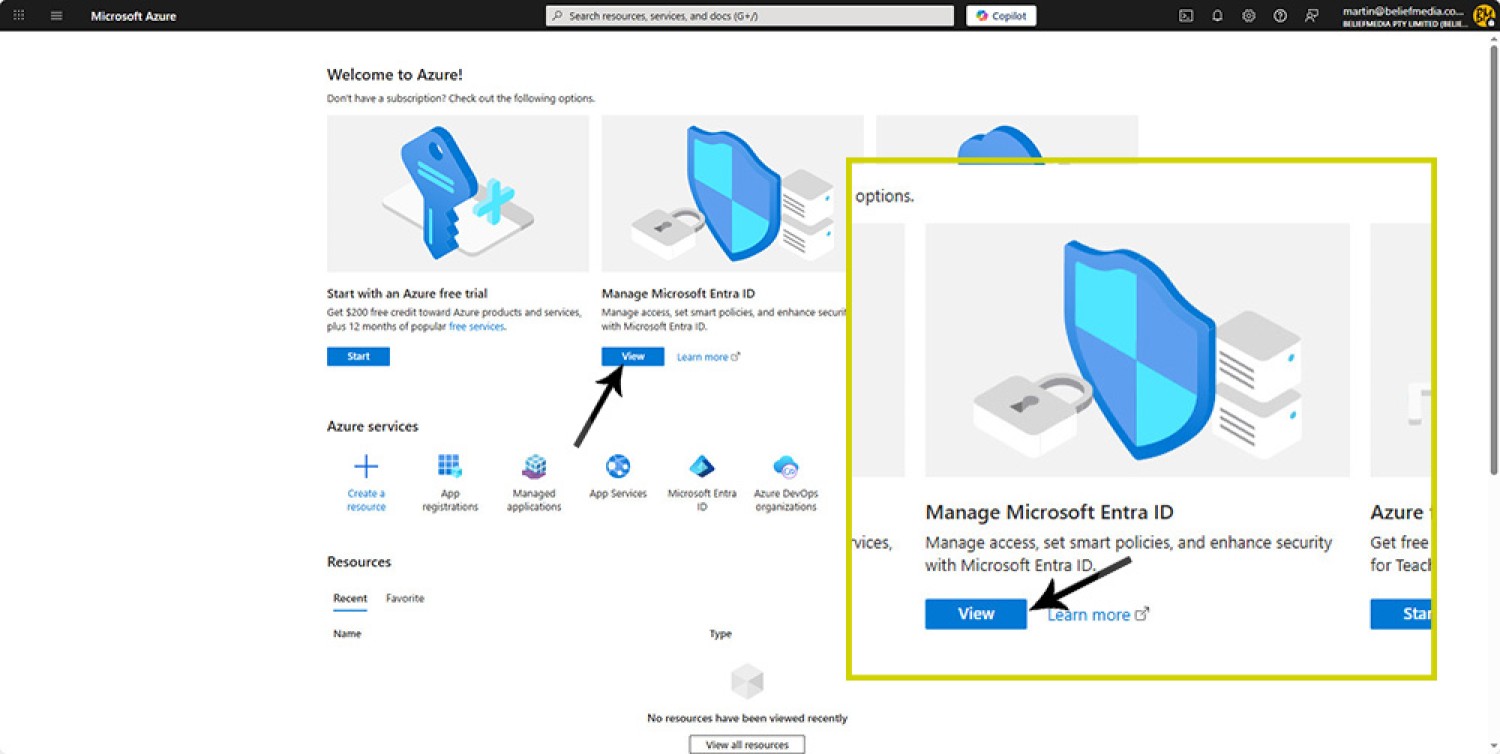
You will be presented with a welcome screen. Click 'Manage Microsoft Entra ID' (View).
3. Azure Overview Screen
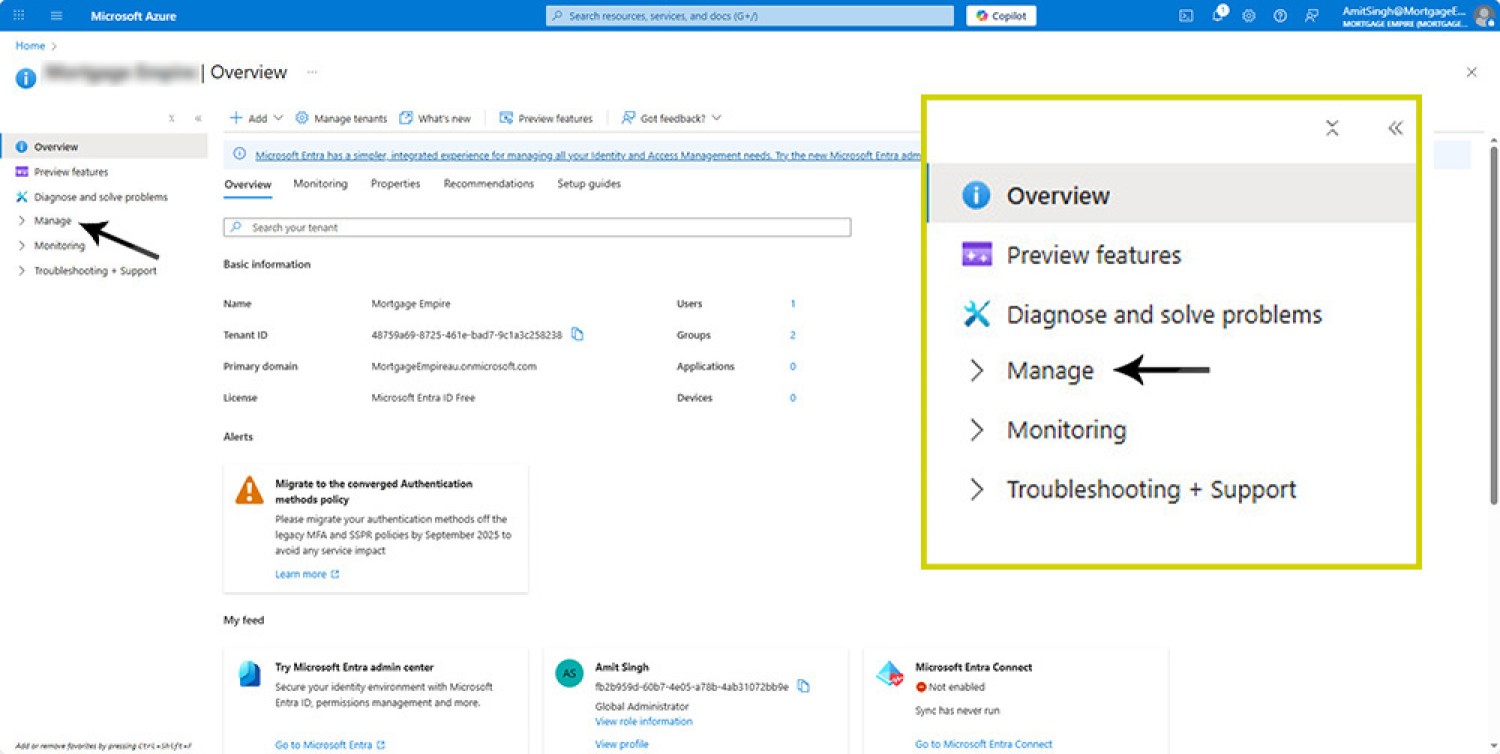
You will be presented with the Azure overview screen. We require the 'Manage' options to be shown, so if they're not opened by default, select 'Manage' in the left panel.
4. Azure Application Registrations
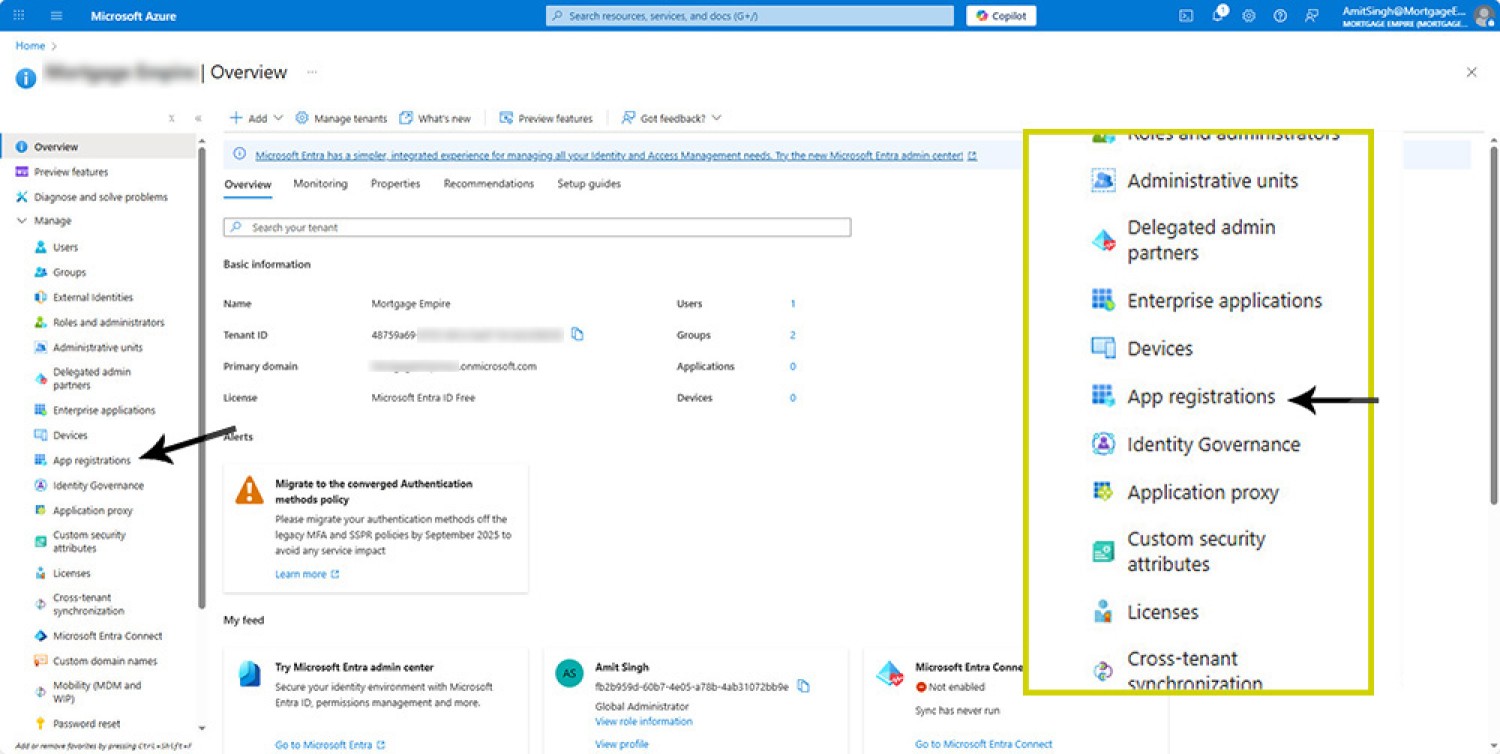
It's at this point that we're going to start creating your application. Select 'App Registrations' from the left panel.
5. Select New Registration
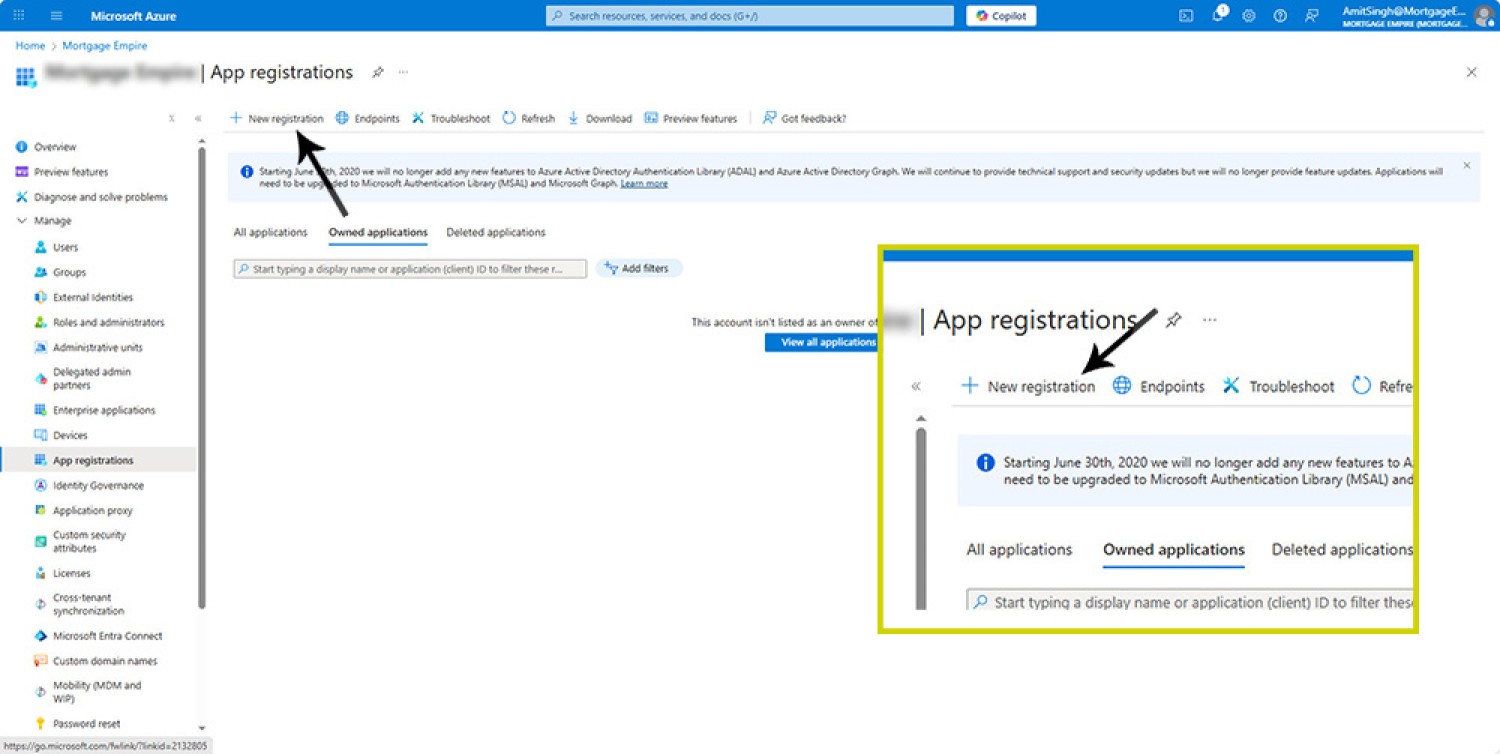
Select 'New registration' from top panel. If you're modifying an existing application, select it from the list in the primary panel.
6. Registration an Application
We're now going to register an application, and these values are important so ensure you copy them exactly as described.
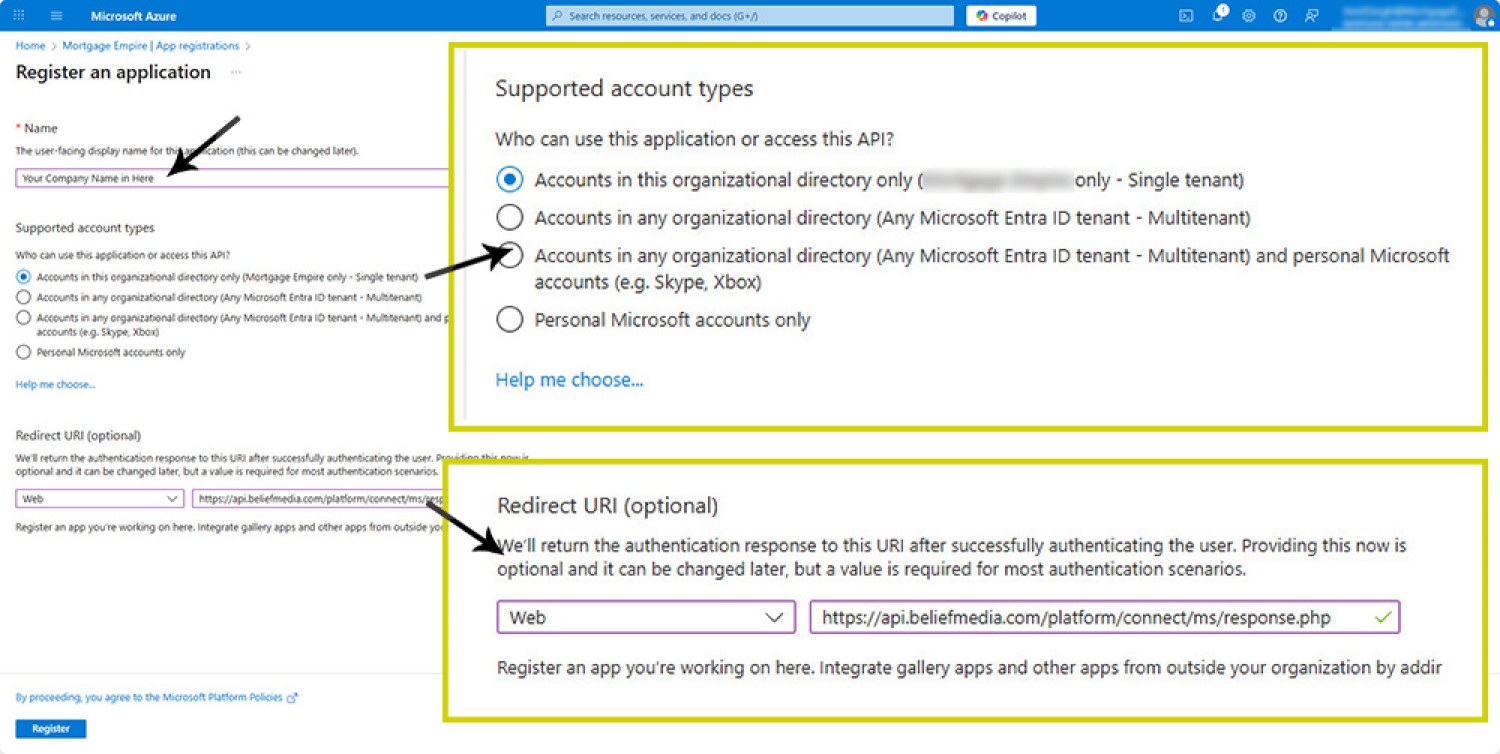
- First, enter an Application Name.
- As pictured, we'll select the Single Tenant 'Supported account type' option.
- Enter the Redirect URI as shown below (this is important and not optional). It is required that you select 'Web' as the redirect type.
Redirect URI is as shown below.
https://api.beliefmedia.com/platform/connect/ms/response.php
Click 'Register'.
7. Copy Application Values
Various application values associated with your newly created application will be returned to the screen. Copy them all into Notepad with their names (some are more important than others).
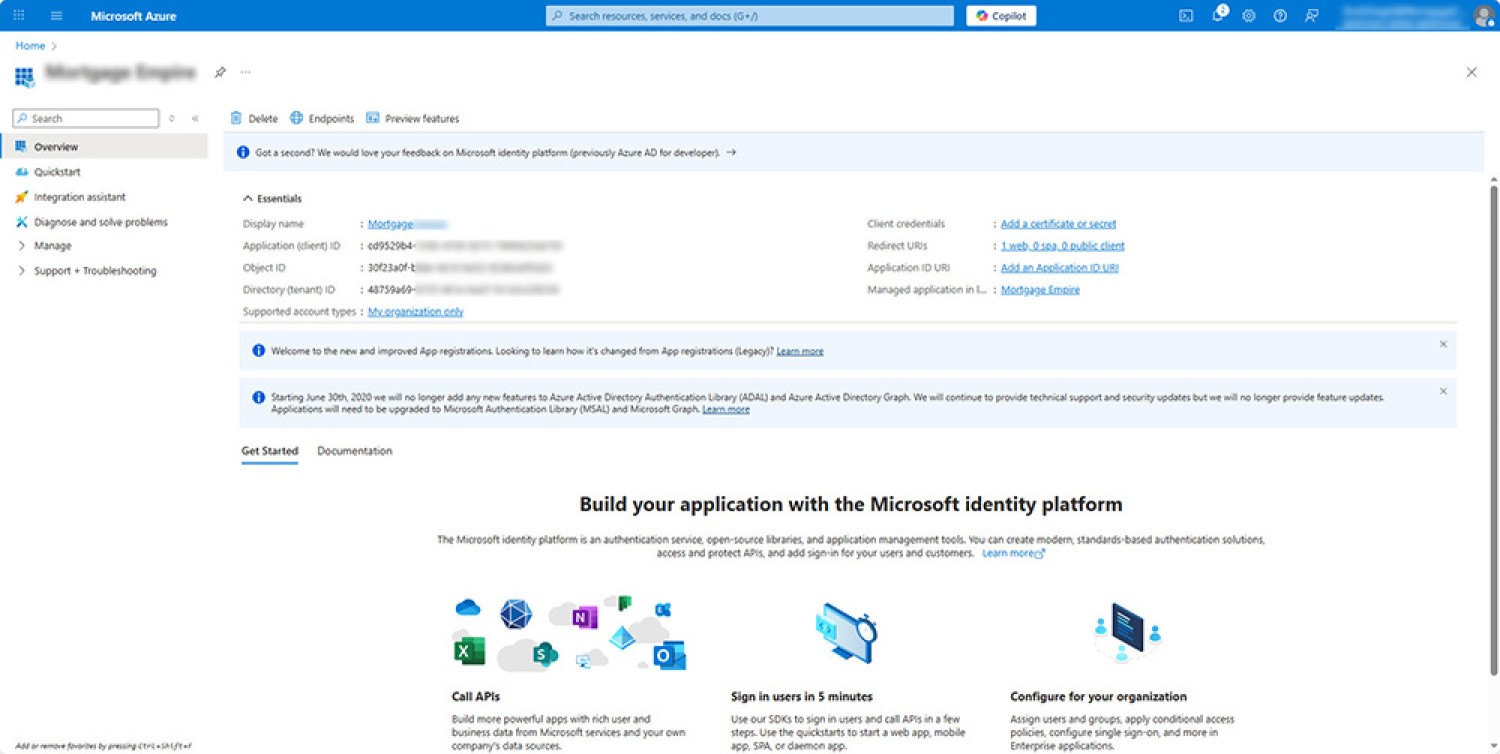
Once done, the next step requires you select 'Manage' from the left menu.
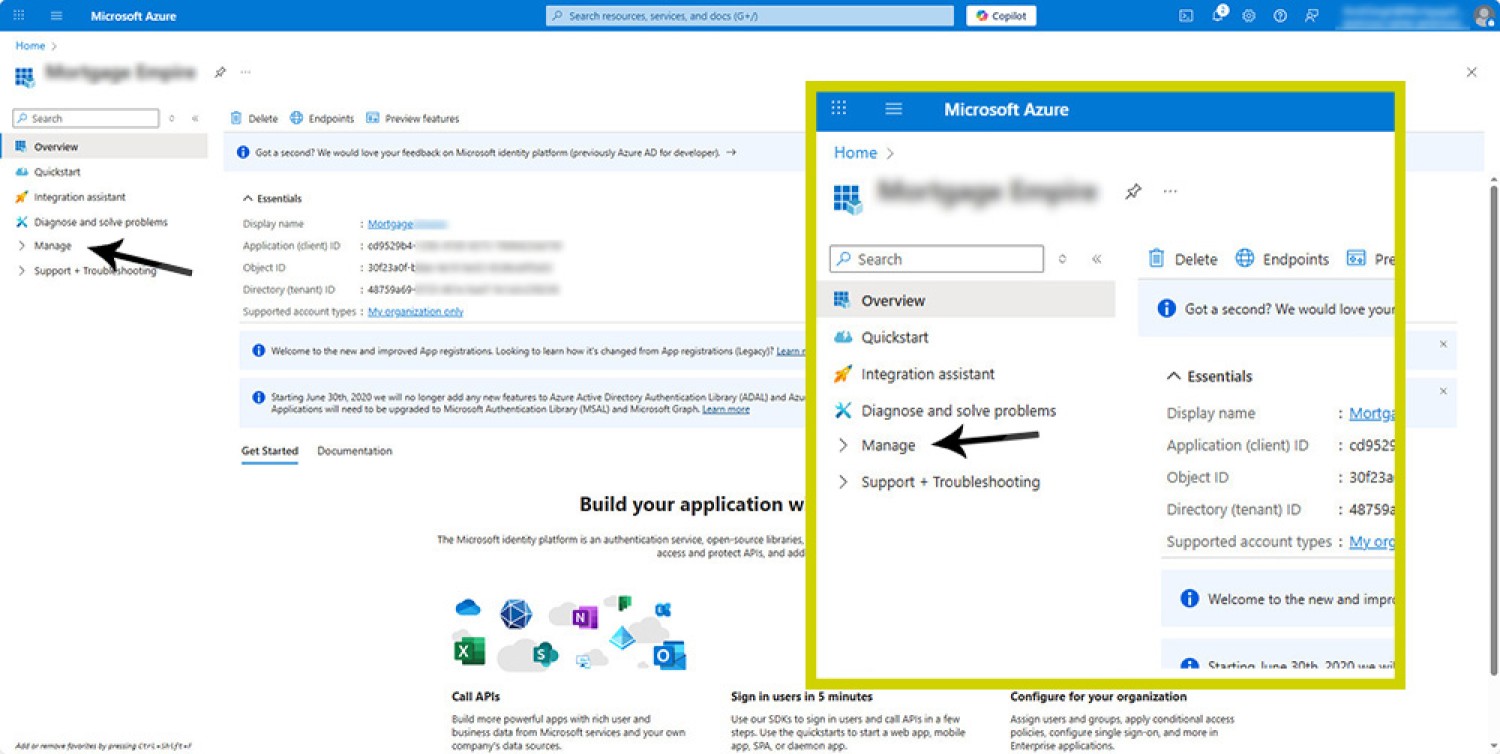
8. Select the Manage Option from Application Page
Select the 'Manage' option from the left menu.
Our next step will require us to select the 'Certificates and Secrets' menu option.
9. Certificates and Secrets Menu Option
Select the Certificates and Secrets option from the left menu panel.
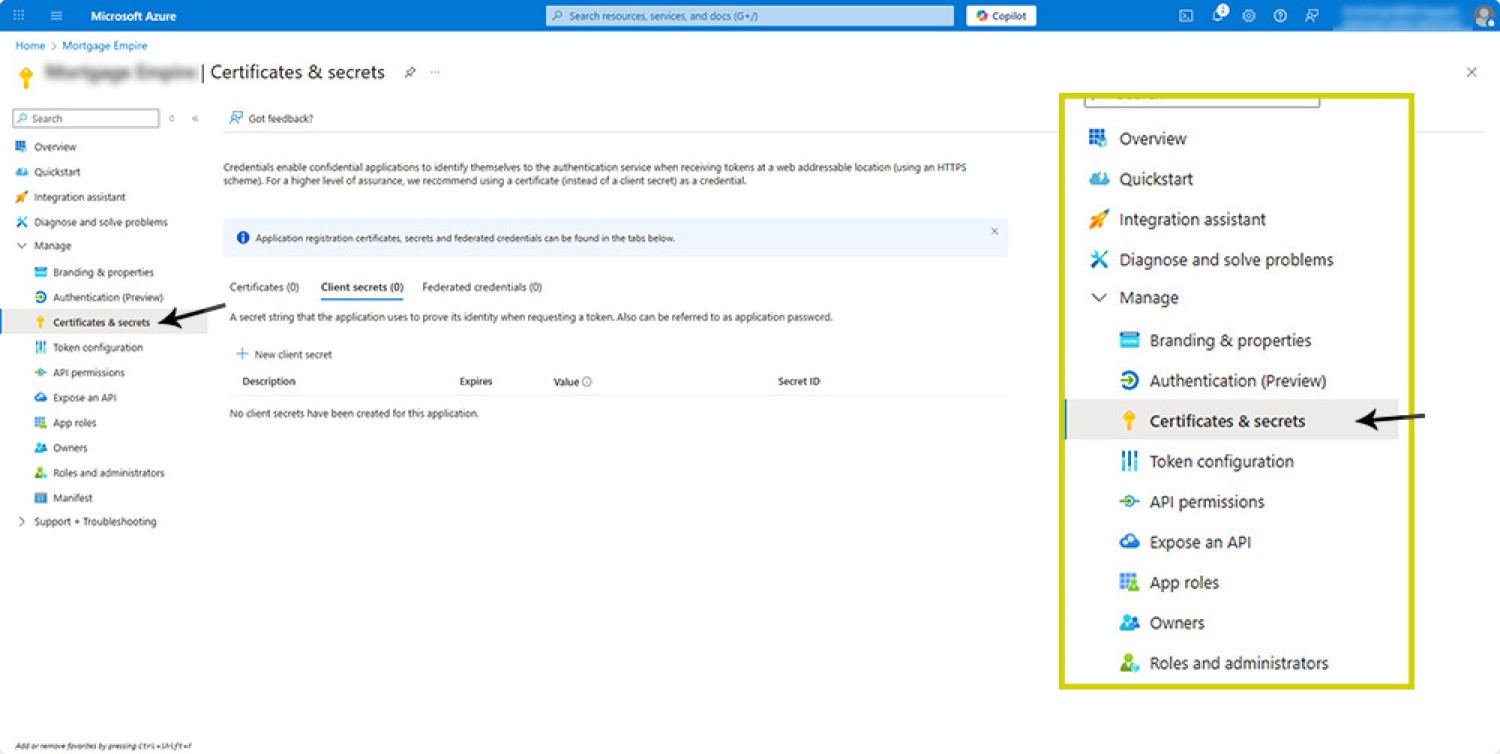
This option opens up the important Certificates and Secrets page.
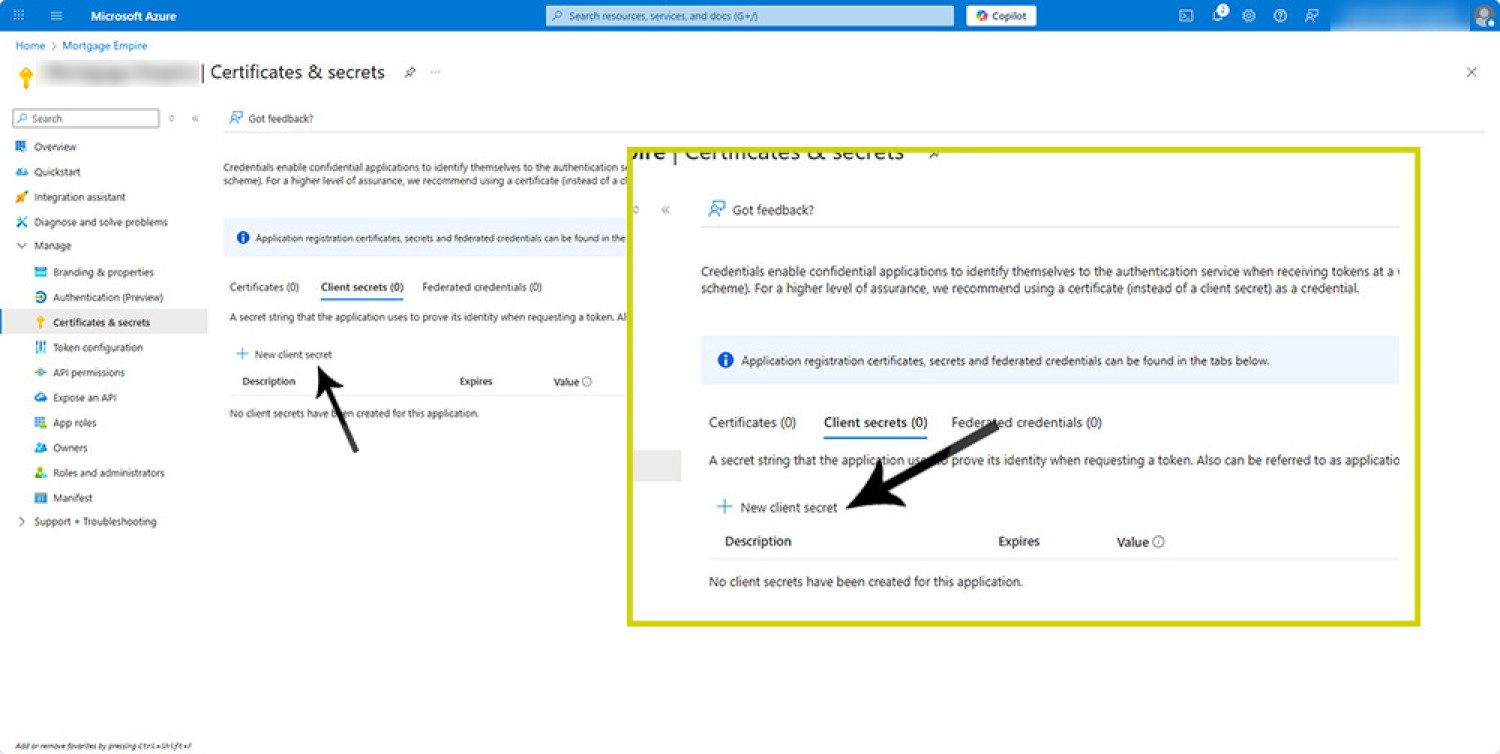
10. Create New Client Secret
From the returned Certificates and Secrets page, select 'New client secret'. This will create the application secret required in Yabber, so it's important.
11. Create New Client Secret and Set Expiry
Selecting 'New client secret' returns a panel to the right (or left). You are required to add a name for this secret (such as XYZ Business, 26SEP2026) and select the required expiry. Select the highest expiry available - usually 730 days (24 months). After this expiry we'll be required to update the application secret for continued connectivity.
Once you have populated these values, select 'Add'. This action will create the secret and return you back to the open screen with newly created values.
12. Copy The Secret Value
This is where Microsoft's naming convention is a little questionable. It's the Secret Value that we'll be copying into Yabber - not the Secret ID, a common mistake. Either way, copy both the Value and Secret ID into Notepad with very clear labelling.
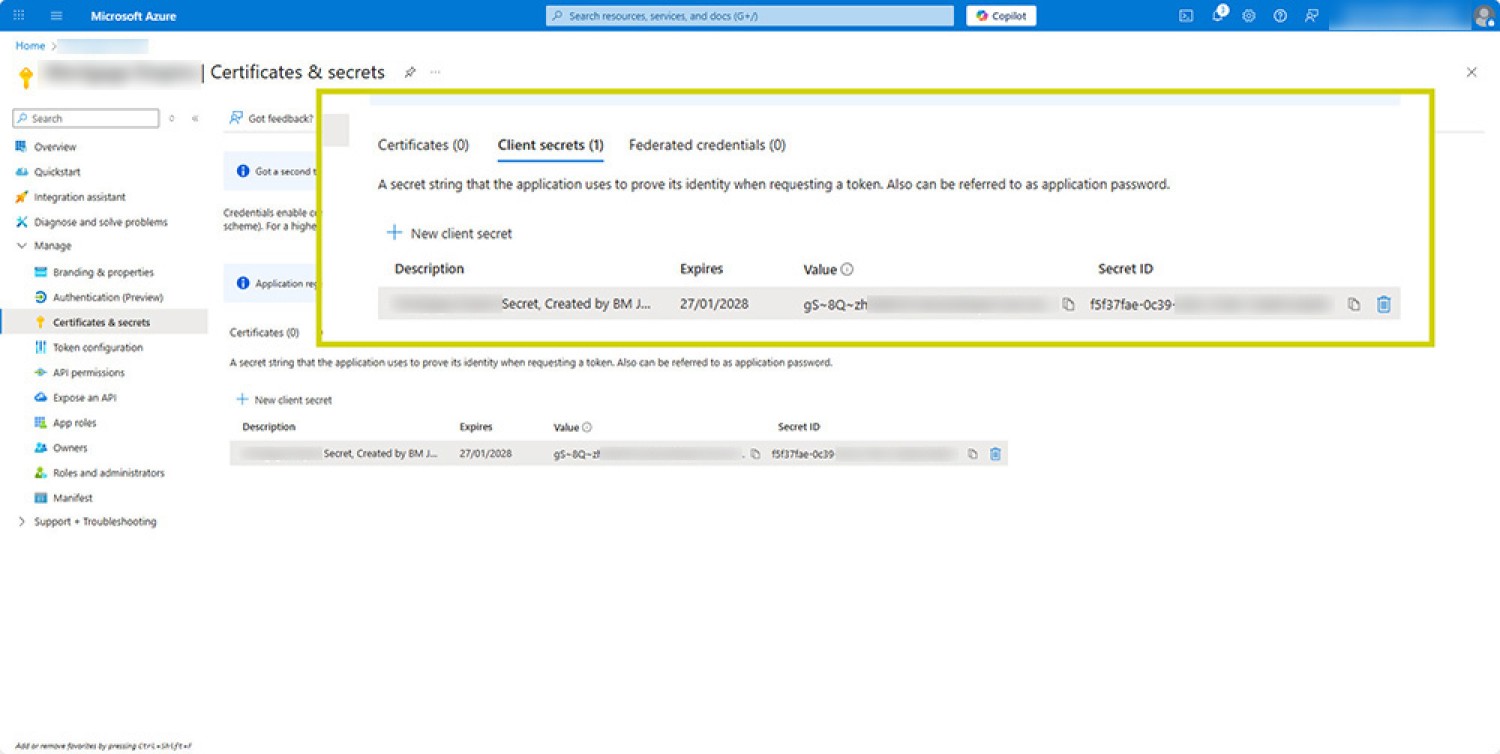
Not the 'Expires' time. After this date your application will cease functioning and a new Secret Value will be required.
13. Select the API Permissions Menu Item
We're required to assign a number of permissions to our newly created applications, and these permissions are required for various types of integration to function. When the menu item is selected, the pictured screen is returned.
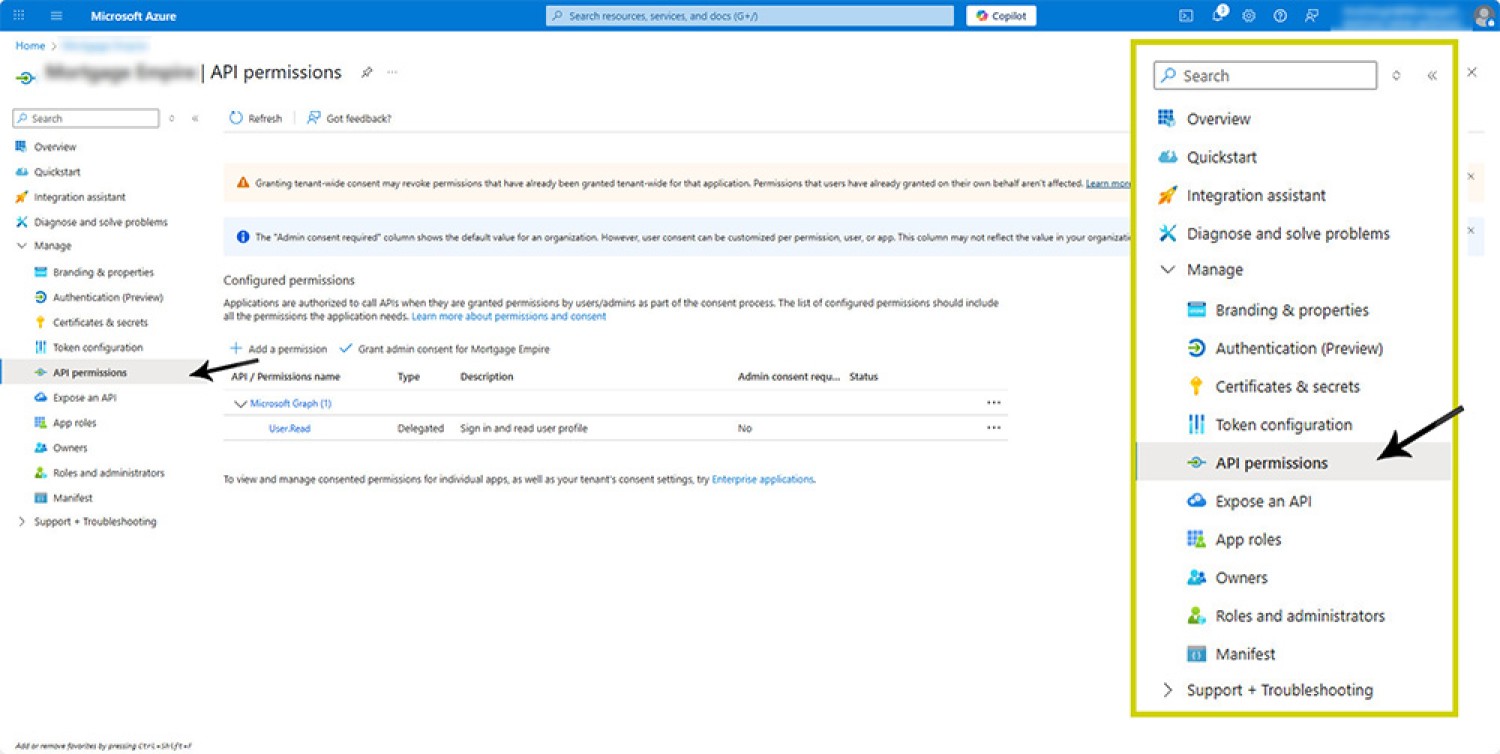
Next, we'll click the 'Add a permission' option.
14. Select Permissions Option
Select the 'Add a permissions' option. This will return a panel to the right (and sometimes the left) of the page.
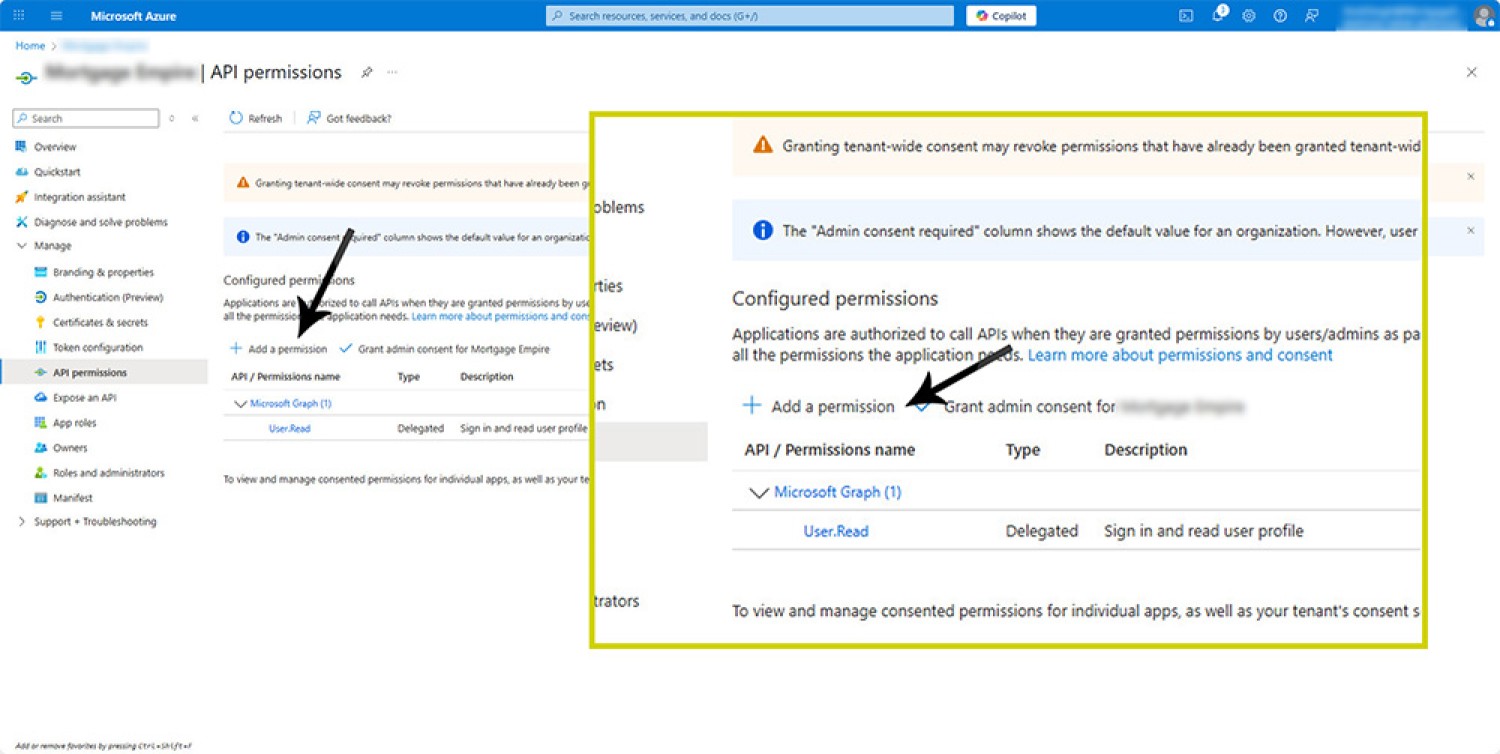
The next step will return a large number of permission options.
15. Select Graph Permission Options
When 'Add a permissions' is selected, a panel will slide into the right (and sometimes the left) or the page. Various permission options are presented. You are required to select the 'Microsoft Graph' option.
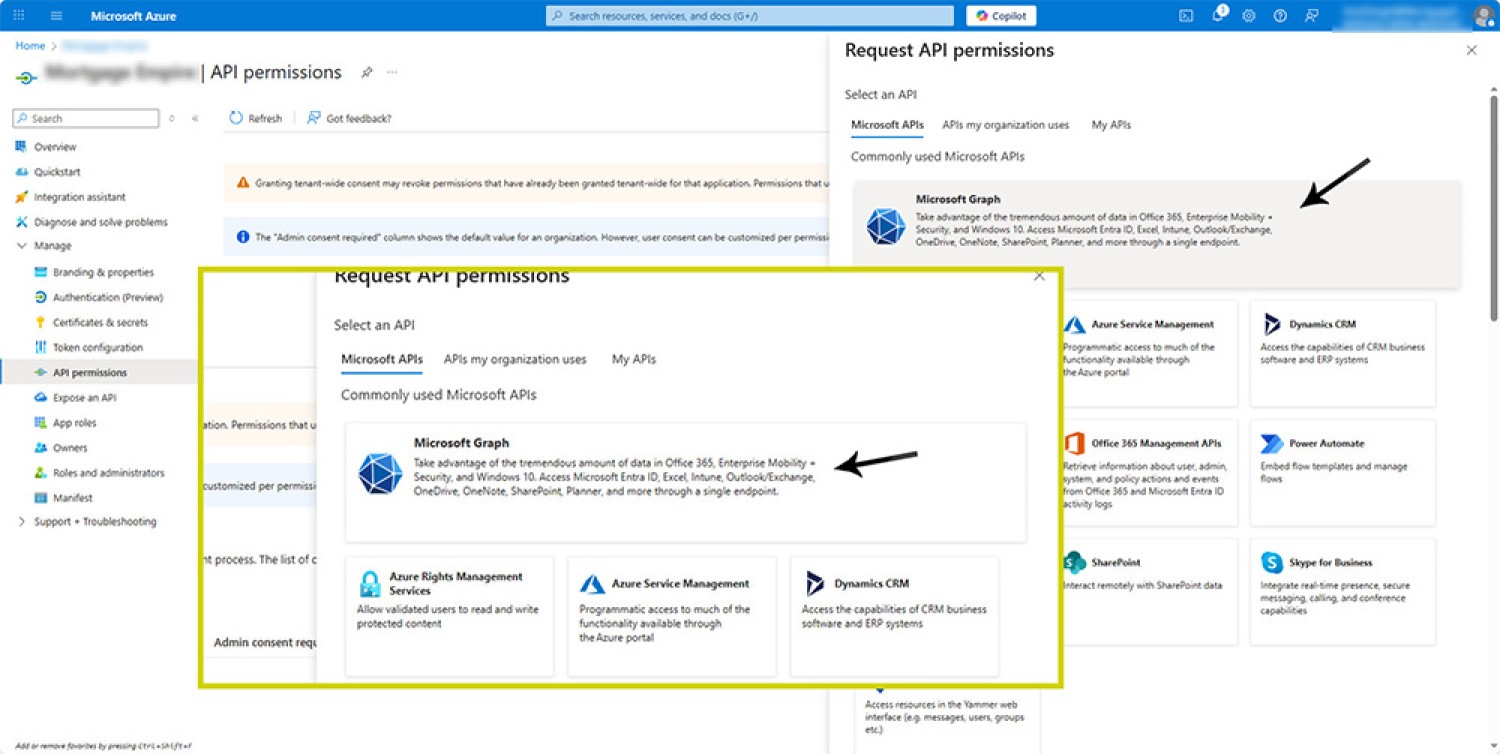
This will return the 'Delegated' or 'Application' option.
16. Select Graph Delegated Permissions
When selected, the option is returned to select 'Delegated' or 'Application' permissions. Select 'Delegated Permissions'.
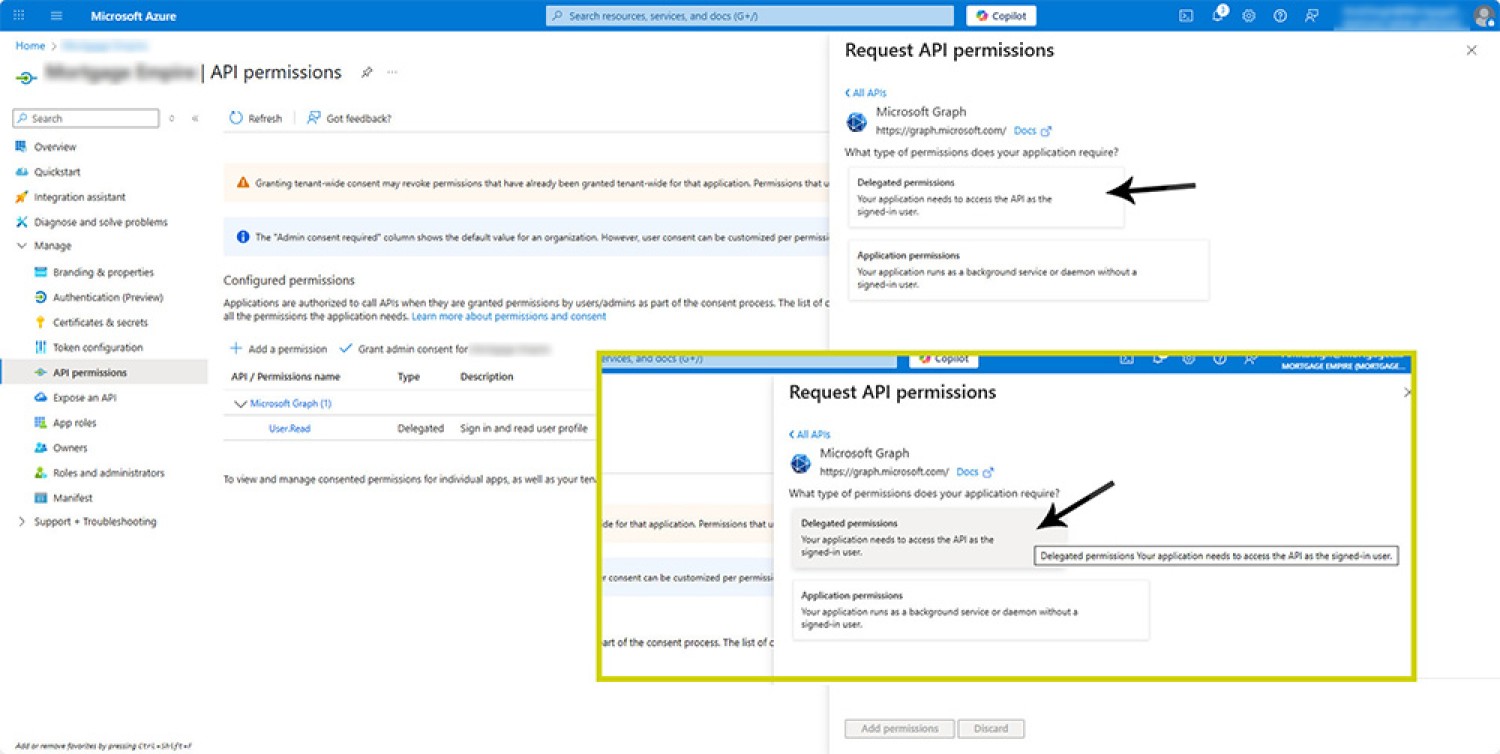
The next step gets messy; we're going to assign all the initial permissions to our application.
17. Select Application Permissions
Selecting 'Delegated Permissions' returns a large number of graph permission. Our initial permission list is shown below. Select each permission exactly as shown.
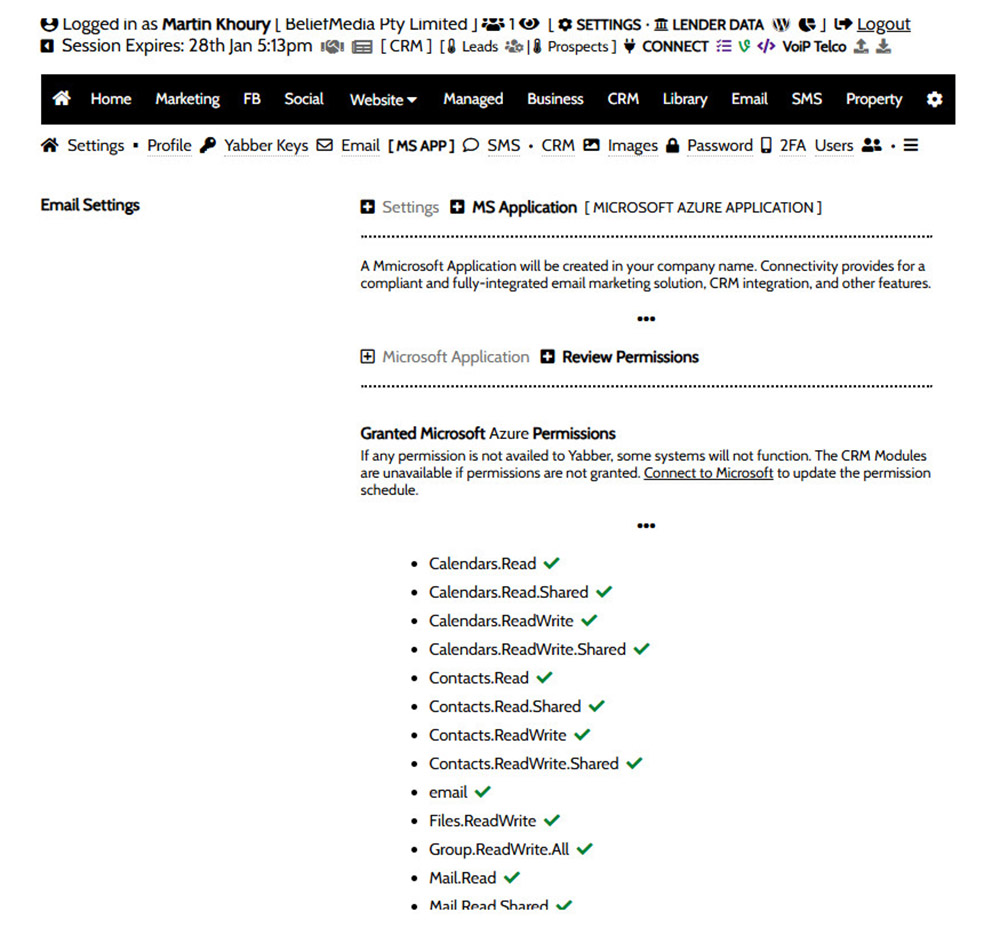
Initial Permission List: This is an initial permission list. There are occasions where a new permission might be required. All required permissions are listed in Yabber with a green tick or red cross , with the latter indicating that the permission is yet to be assigned. Another FAQ details the permission screen.
●

Select 'Add Permissions'.
●
Ensure that each required permission is selected. Once Add Permissions is selected you'll be returned to the Permission screen with the selected permissions listed.
18. Grant Admin Consent
Once your permissions are saved and the permission screen is returned, we can grant Application Consent. Select 'Grant admin consent for your-application-name'.
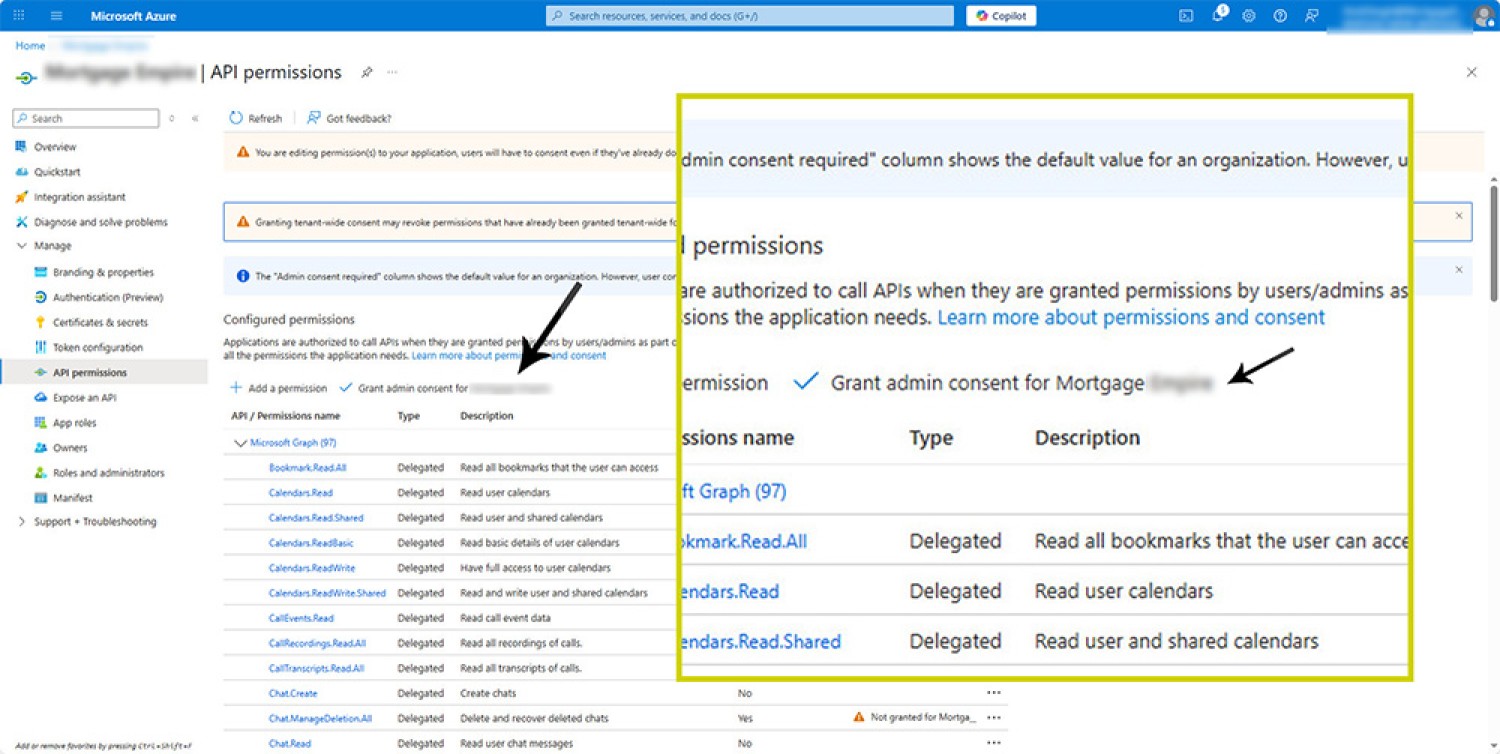
A dialog box will be returned in the modal asking to confirm your consent decision. Select 'Yes'.
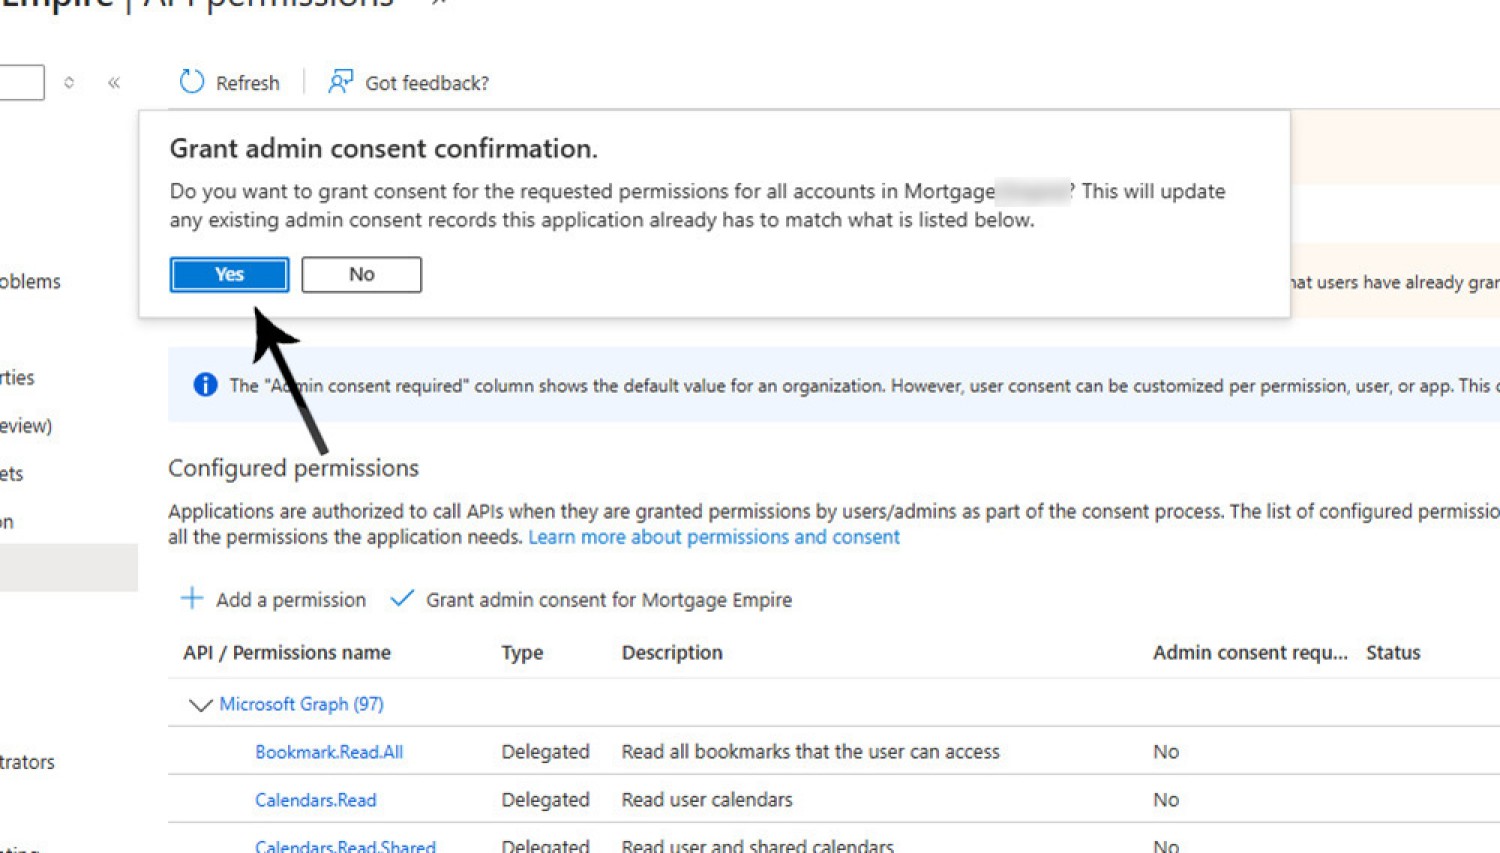
The screen will be returned to the permissions page.
19. Application Branding and Properties
Select 'Branding & properties' from the left panel. Give your application a consumer-facing name, upload a logo, and provide your website, terms and privacy URLs.
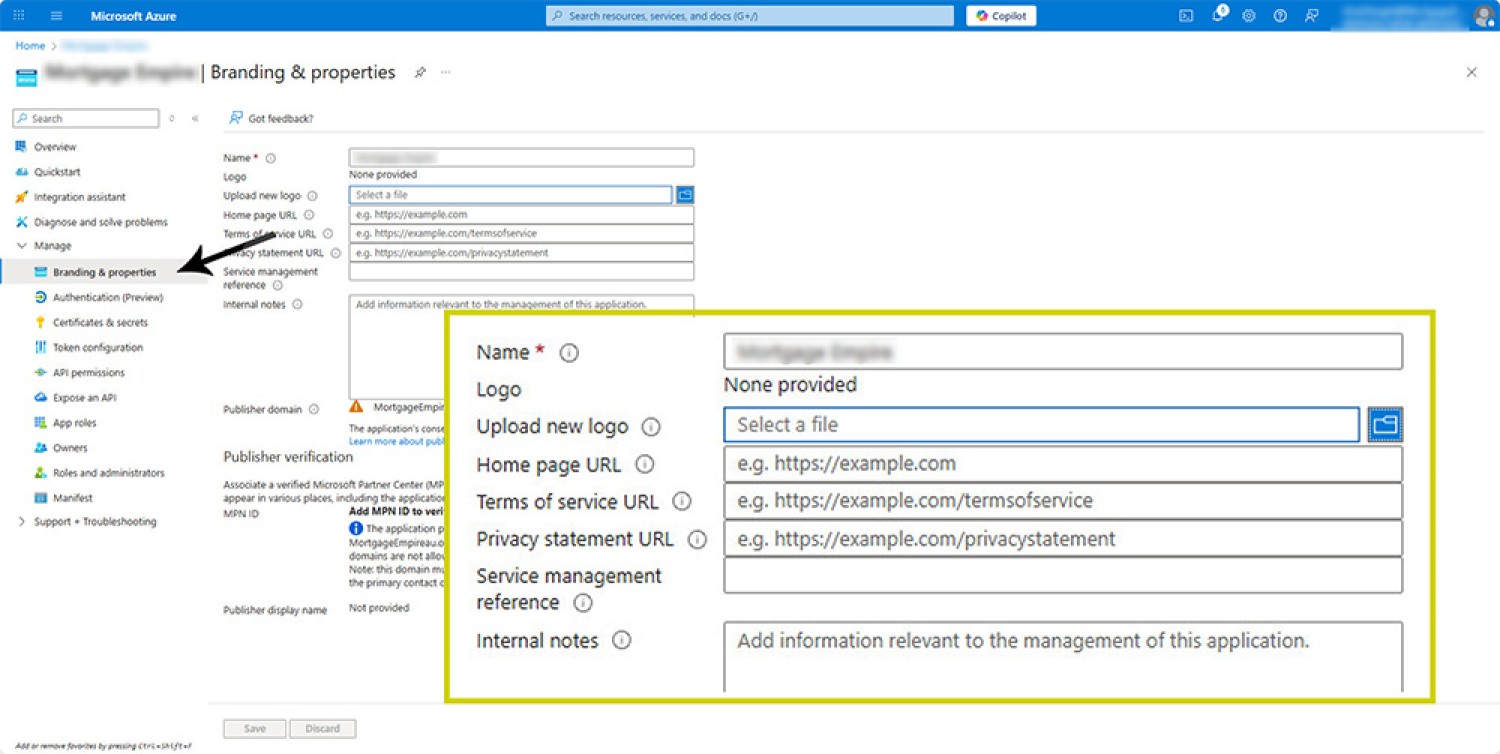
This is the last step before we migrate our earlier keys and values to Yabber.
Updating Yabber with Microsoft Application Values
Hopefully you have made a record of all values exactly as they were shown to you during the application process. We require the following three values:
- Application (client) ID. Application (client) ID.
- Value. Value, not the Secret ID.
- Directory (tenant) ID. The tenant.
Select the 'gear' settings icon from the top right, and then select 'MS APP' from the child menu. An option is returned for each of the required values.
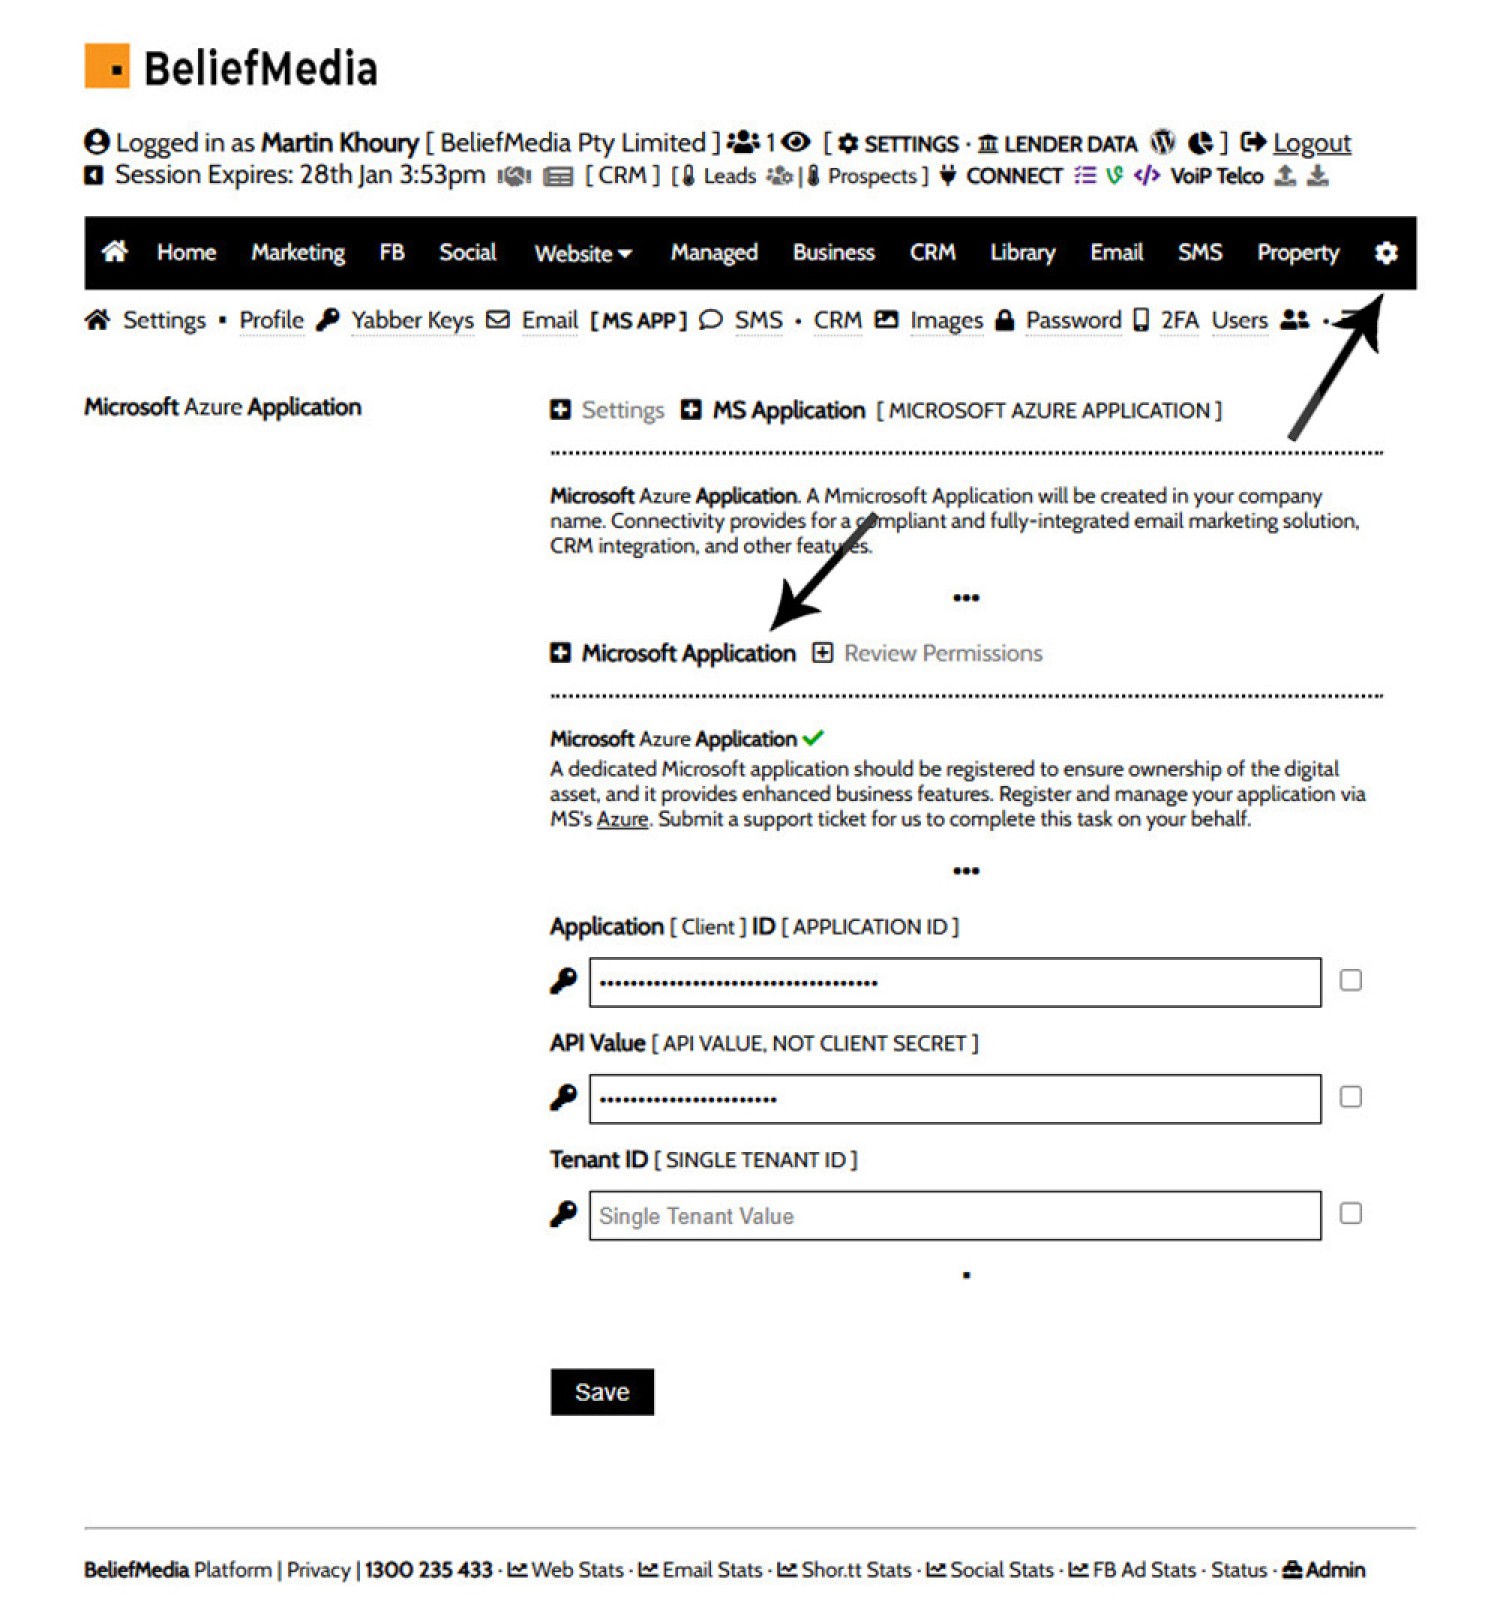
Pictured: Select the 'gear' settings icon from the top right, and then select 'MS APP' from the child menu. An option is returned for each of the required values.
The small checkbox to the right will show values. Popular the required values and click 'Save'.
Connect Yabber to Microsoft
We'll now test our Microsoft application by connecting Yabber to Microsoft. Select the 'CONNECT' text from the header and the Connect screen will be returned .
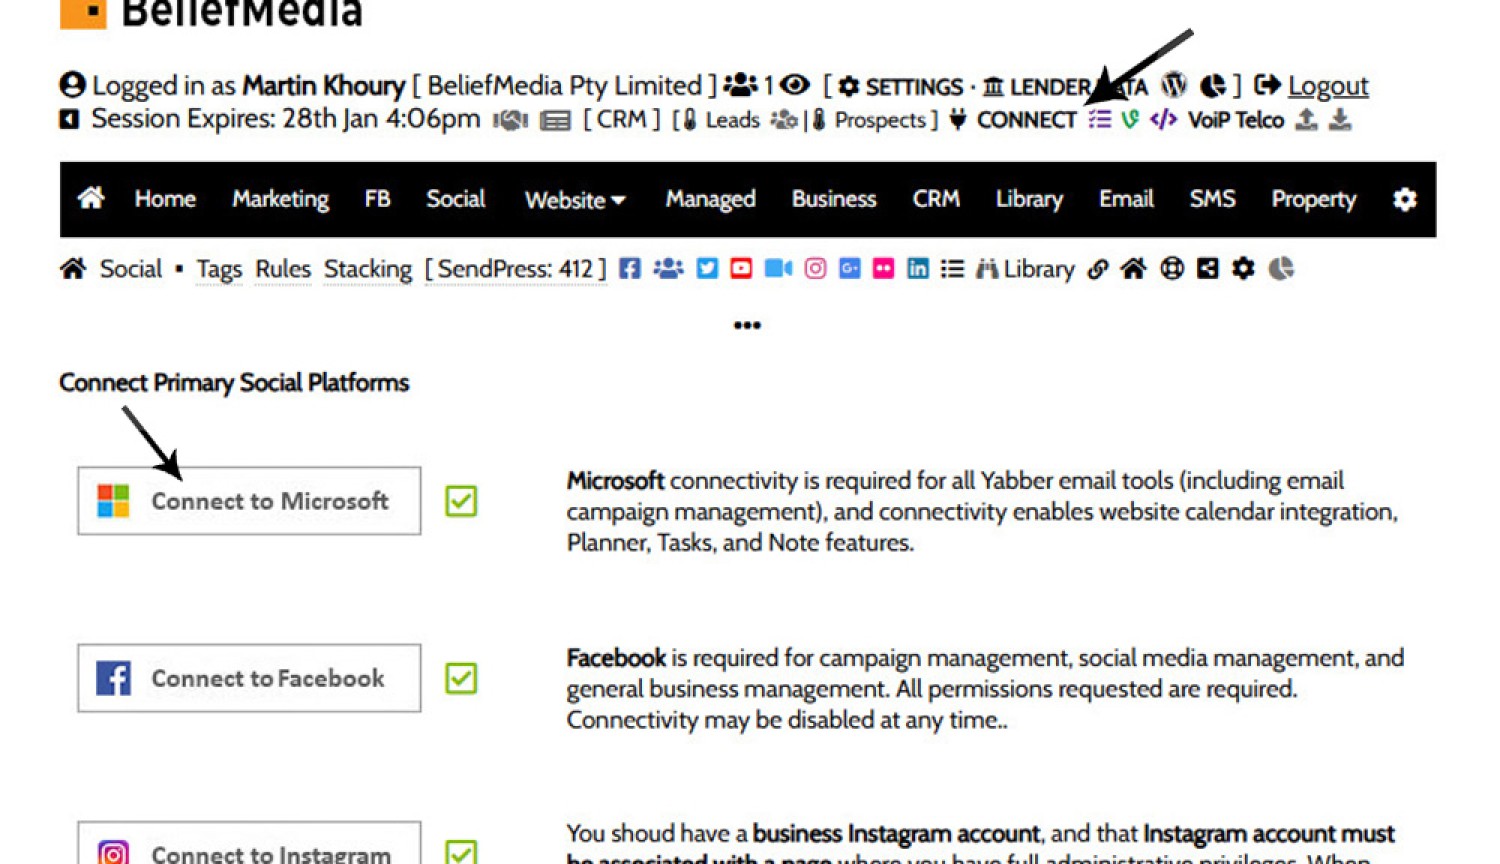
Click the Microsoft icon and the authentication flow will start. You will be redirected to Microsoft where your application entry screen will be returned.
Pictured: Click the Microsoft icon and the authentication flow will start. You will be redirected to Microsoft where your application entry screen will be returned.
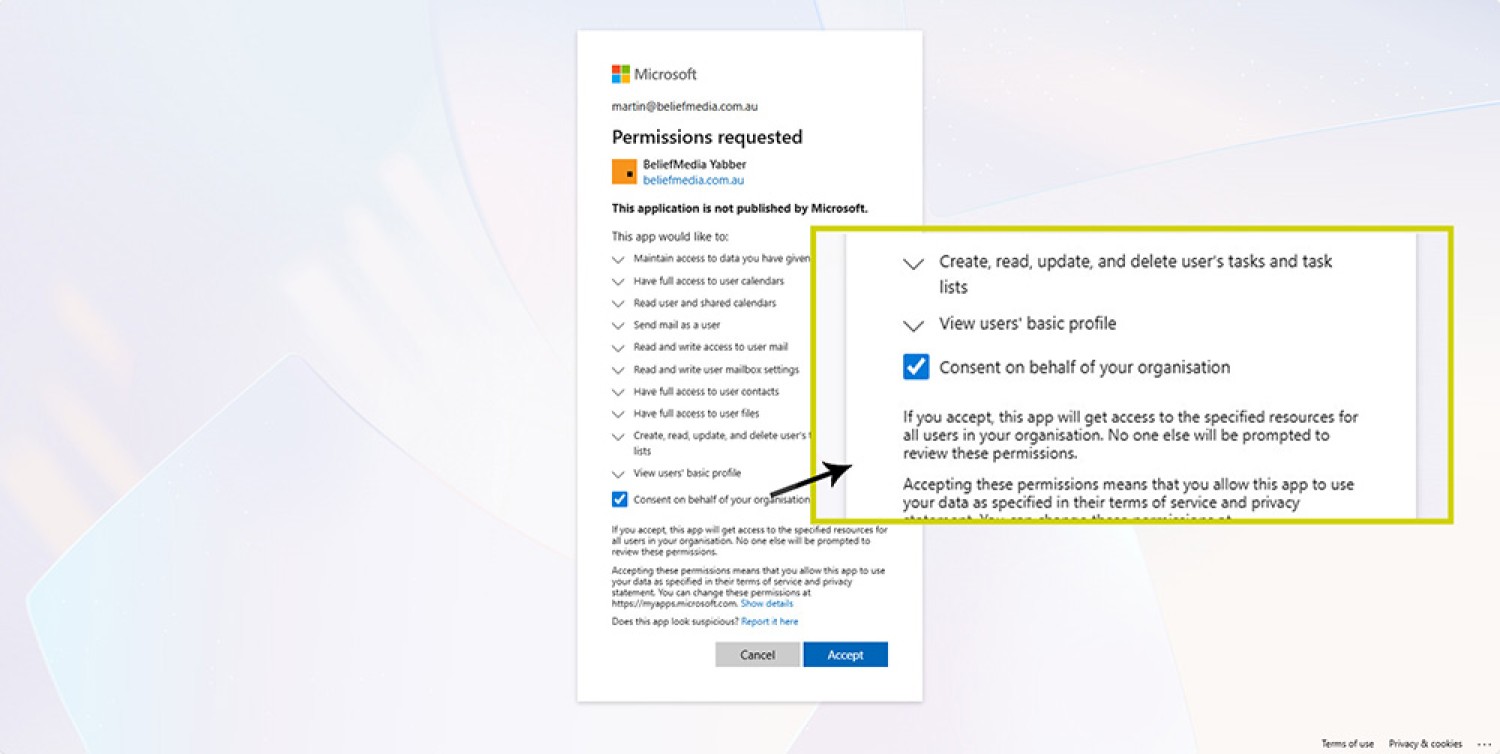
Whenever the 'Consent on behalf of your organisation' checkbox is displayed, it should be selected. Select 'Accept'.
You will be redirected back to the platform. A message showing a successful connection (or failure) will be shown.
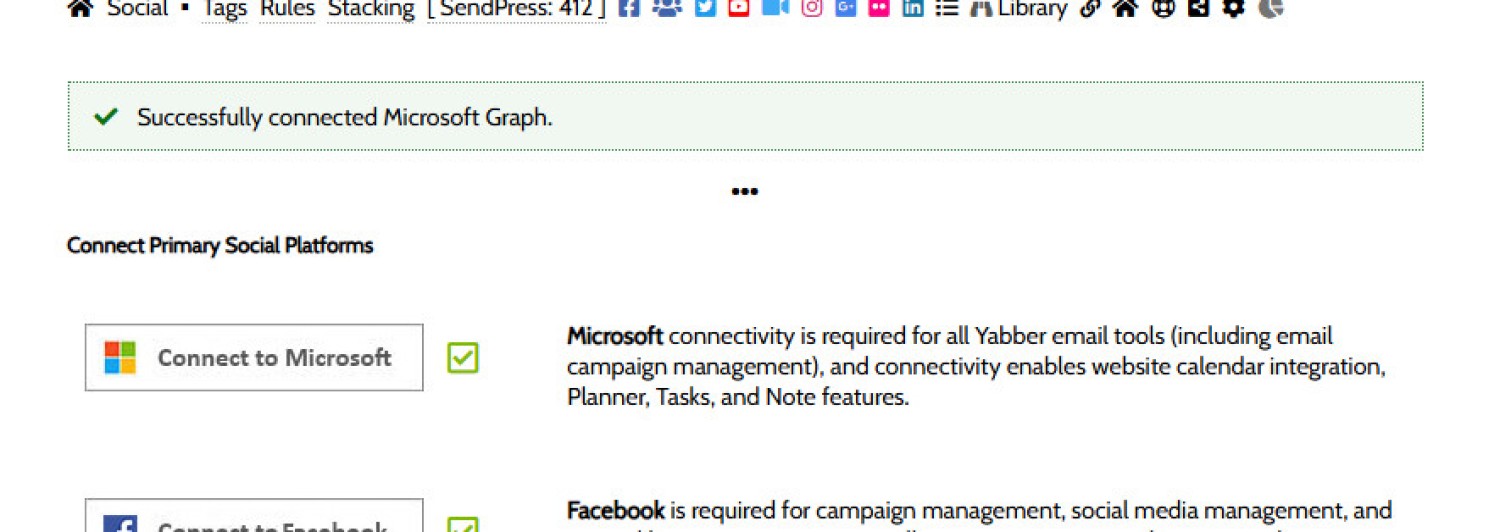
Pictured: Whenever the 'Consent on behalf of your organisation' checkbox is displayed, it should be selected. Select 'Accept'. You will be redirected back to the platform. A message showing a successful connection (or failure) will be shown. A green tick will be placed next to the Microsoft tile.
A green tick will be placed next to the Microsoft tile.
Conclusion
In integrating all your own applications with Microsoft you’ll be doing what very few businesses are doing. Certainly, the number of brokers that build applications into their everyday workflow is limited only by the number of people we work with, and we consider it be a marketing imperative.
Once we’ve fully connected you to the Microsoft ecosystem your broking life will change. From this point on, any application or tool you currently use can be integrated with Microsoft tools in any manner that tickles your fancy.
■ ■ ■
Related Microsoft FAQs
Microsoft is heavily integrated into your social and marketing tools. Selected Microsoft FAQs are shown below.
Yabber is not a CRM. Yabber is a marketing system designed to communicate with various CRMs in various ways and manage marketing assets. Yabber users are generally synced via your CRM to Yabber, or visa versa, and each contact in Yabber is usually resolved to a CRM user automatically (by phone number, email, or some… [ Learn More ]
As described in an FAQ titled "", Yabber is not a CRM. Yabber is a marketing system designed to communicate with various CRMs in various ways and manage marketing assets. Yabber users are generally synced via your CRM to Yabber, or visa versa, and each contact in Yabber is usually resolved to a CRM user… [ Learn More ]
Connectivity with Microsoft OneDrive enables different types of syncing and sharing options across a large number of modules. Initially designed to sync client documents uploaded via the FileInvitation module, it has since found its way into about a dozen modules. Note that enabling this modules gives Yabber access to only those folders that it creates… [ Learn More ]
Microsoft Contact Folders aren't as relevant as they once were, and the 'new' (2024) versions of Outlook will categorise contacts with 'Categories' rather than folders, although folders are still made available even if they're not part of the standard Outlook interface. Yabber will still require that a contact folder be applied from time-to-time, although they're… [ Learn More ]
Part of our website and Yabber architecture requires that we create a on your behalf. This application is owned by you, and the applicable keys from that application are stored in Yabber which enables considerable integration between your website and other marketing (such as email marketing). We generally request only those permissions that are required,… [ Learn More ]
In various FAQs we introduce the concept of a 'Dynamic Email Signature', or a signature that references engaging up-to-date information of a specific type. We know that every touchpoint should create engagement of some type, and email is used daily so it stands to reason that we'll use the tool to manufacture various pathways. The… [ Learn More ]
This FAQ applies to those that have an established but the functionality is failing, most likely indicated by the failure of your , or . The first step when any Microsoft connectivity fails is to reconnect via the 'CONNECT' panel, although this is a step that's required to ensure that the integrity of your Microsoft… [ Learn More ]
GoDaddy makes it very difficult to create the in Azure that supports your business through Yabber. We always recommend signing up for your Microsoft subscription directly through Microsoft and third-party providers for this reason. Creating an application through your native Microsoft account is a straight-forward process. GoDaddy, however, provides significant roadblocks that increases application complexity,… [ Learn More ]
Microsoft Azure is described as "an ever-expanding set of cloud services to help your organisation meet your business challenges. It is the freedom to build, manage and deploy applications on a massive, global network using your favourite tools and frameworks." So, Azure is a cloud-based hosting and application backend that supports small business through to… [ Learn More ]
Yabber has multiple ways in which to notify broker of new leads, such as email, SMS, CRM, Planner, webhooks, but the easiest way of building a simple notification system is via an RSS feed. RSS stands for 'Really Simple Syndication', and it works by ingesting multiple RSS 'feeds' into a single aggregated source. Typically used… [ Learn More ]
There are social services that take great pride in providing an online calendar for the purpose of scheduling your social media. It's an acceptable option, but it's just another service that'll require a subscription, and it's just another service that'll keep your data once you leave. We've reinvented the method of sending content to social… [ Learn More ]
The facility to add an email or any other type of subscriber to a Microsoft Contact folder was introduced in the FAQ on . The purpose of adding a contact to segregated Microsoft Outlook contact folder is more than just 'providing a backup' as many see it. The lists are used when sending text messages… [ Learn More ]
The Vista Social Media Calendar is an essential component of a number of social and managed programs. The calndar is a function of integration with Microsoft systems, and it enables a level of control and integration that will empower your business in ways that'll make your competitors fuzzy little heads explode. Important: Creating a calendar… [ Learn More ]
Related FAQs
Related FAQs and features.
In January of 2025 we introduced new strict security protocols to further protect your website resources and data. This update now requires that any IP used to access various resource must be whitelisted before those resources are accessed. If a resource (such as a website login) is accessed before the IP is whitelisted, your IP… [ Learn More ]
Part of our website and Yabber architecture requires that we create a on your behalf. This application is owned by you, and the applicable keys from that application are stored in Yabber which enables considerable integration between your website and other marketing (such as email marketing). We generally request only those permissions that are required,… [ Learn More ]
This FAQ applies to those that have an established but the functionality is failing, most likely indicated by the failure of your , or . The first step when any Microsoft connectivity fails is to reconnect via the 'CONNECT' panel, although this is a step that's required to ensure that the integrity of your Microsoft… [ Learn More ]
GoDaddy makes it very difficult to create the in Azure that supports your business through Yabber. We always recommend signing up for your Microsoft subscription directly through Microsoft and third-party providers for this reason. Creating an application through your native Microsoft account is a straight-forward process. GoDaddy, however, provides significant roadblocks that increases application complexity,… [ Learn More ]
A webhook is a notification sent from Yabber to a defined location on the basis of another action taking place. For example, you might have a new lead arrive in Yabber, or a user might complete a fact find, and you will want that information sent to another system. The webhooks module is an extremely… [ Learn More ]
Yabber has multiple ways in which to notify broker of new leads, such as email, SMS, CRM, Planner, webhooks, but the easiest way of building a simple notification system is via an RSS feed. RSS stands for 'Really Simple Syndication', and it works by ingesting multiple RSS 'feeds' into a single aggregated source. Typically used… [ Learn More ]
When a user submits any kind of form in Yabber they will be registered to the applicable system, and in almost all cases they'll be filtered through to a primary Leads Table. The Leads Table is the primary record of all of those users that submit any kind of interest on your website or elsewhere,… [ Learn More ]
Almost without question, BeNet is the single most sophisticated AI made available in the finance industry. For all intents and purposes, it has to be considered to be an extremely knowledgeable mortgage broker with an expert understanding of digital marketing, processes, systems, policies, property, finance, best practice, and your marketing efforts. BeNet is connected to… [ Learn More ]
All rate data returned via Yabber will automatically segregate the requested 'standard' products from those 'conditional' products, such as green finance or leveraged residential lending against a business product. In all cases where we've had feedback from users and the validity of rates was questioned, the product has existed and was entirely valid, but the… [ Learn More ]
Before email and calendar tools may be used, we generally have to define our default email and calendar for various facilities. This action is normally completed by us during the setup, but if you're doing it yourself, or you are required to alter values, this FAQ will guide you through the process. It will only… [ Learn More ]
A company profile should be created in Yabber, and this is one of the first onboarding tasks. The details supplied here are those that are used by default throughout Yabber, including the White-Label e-book module that'll with your company details. Find the 'Profile' options by navigating to the Settings module. Select the 'Profile' option and… [ Learn More ]
Yabber requires a number of images in order to perform certain tasks, such as white-labelling marketing material, created Fact Find report consumer guides, creating SEO markup, and so on. The following images are required: Company Logo. 500px x 500px Black and White Company Logo. 500px x 500px Wide Company Logo. 600px x 100px SEO Logo.… [ Learn More ]