
Straight up - this is going to get weird. You're probably familiar with the standard way in which to add images to your website. You select the 'Add Media' button in your post editor, upload an image, and a bunch of HTML is returned to your page. That's arguably the easiest way of including an image in your post, but it is far from the most efficient. In this FAQ we're gong to introduce you to an image shortcode that we use by default... in fact, every image on our website is rendered using the methods described on this page. We'll show you to optimise your image for file size (which is automated, so there's not much to show), and we'll show you various ways of scaling the image and addition caption types.
Image Modal Link Shortcode: You may also be interested in reading about how to include an image modal link  in a post or page with shortcode. Sometimes you'll need to make an image available to a user without rendering it to your page, and this linking method is part of the broader linking architecture and is described in an FAQ titled "How to Link to an Image Modal in a Post or Page with Shortcode".
The Basics of Image Shortcode
First, it should be said that the standard method you're currently use to render images is perfectly acceptable. You select the 'Add Media' button in your post editor, upload an image, populate the alt, title, and caption text boxes, select the 'Insert into Page' button, and a bunch of HTML is returned to your page.
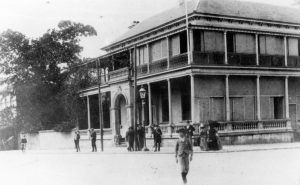
The following image was returned with our basic shortcode of [image caption="1"]72199[/image]. The result:
Note that the required SEO alt and (optional) title attributes, and the image caption, were automatically applied. The image was also automatically scaled and optimised for our defined default image width (more on this in a moment).
We find the generic caption formatting boring and you'll never see it on our website (or in any of the articles we send to your website). In the next example - referencing the same image - we'll use the pictured attribute. Shortcode of [image pictured="1"]72199[/image] returns:
When we render images we don't actually include the pictured attribute in our shortcode. Instead, we use it as a full standalone shortcode under the image that is referenced with the [pictured] shortcode. Our own usage would be presented as follows: [image]72199[/image][pictured]My Caption in here ..[/pictured]. The result:

Pictured: Using the standard method of showing an image is perfectly acceptable. You select the 'Add Media' button in your post editor, upload an image, populate the alt, title, and caption text boxes, and a bunch of HTML is returned to your page. This caption was written into the post - it isn't referencing the caption as we've defined in the WordPress media library.
Using a full post-width caption is simply our preference. We've included the caption in full within our pictured shortcode, but we could have used the Image ID within the pictured tags to return the caption as we've defined in WordPress. So [image]72199[/image][pictured]72199[/pictured] returns the same as above (with the exception of our last sentence). The result:
Pictured: Using the standard method of showing an image is perfectly acceptable. You select the 'Add Media' button in your post editor, upload an image, populate the alt, title, and caption text boxes, and a bunch of HTML is returned to your page.
Keep in mind that there's a default [caption] shortcode made available in the WordPress core  that you may style yourself with CSS.
Copying Shortcode from the Image Library
You don't have to remember the shortcode we've just described. When you open and/or upload an image, the shortcode is returned when you select the applicable image. The three basic shortcodes we introduced above are available to be copied (so, a basic image, image with caption, and image with our pictured caption). The pictured option is preferred because we have control over presentation (as we'll show shortly).

Pictured: To copy this image, we've selected the 'Shortcode' option since we don't want the caption to automatically render. The shortcode is copied into your post or page and renders a nicely scaled image optimised for SEO, filesize, and delivery.
There are a couple of other image shortcodes that aren't shown in the screenshot!
Modifying the alt and title Tags
Using our image shortcode will automatically apply the alt and title tags. However, you may modify by using the alt or title attributes in your shortcode. For example, shortcode of [image alt="This is my alt text" title="This is my Image Title"]72199[/image][pictured]72199[/pictured] will alter tags as defined.
A number of other attributes apply, such as width, and these are introduced at the end of the FAQ (they're rarely used).
The Pictured Shortcode
We've explained how the pictured attribute in your shortcode will automatically render the caption populated in the WordPress media library. Excluding the pictured (and caption) attribute will render the image only. However, not unlike the notes and task shortcode introduced in another FAQ, the pictured shortcode returns a standalone block of text that inherits its own default style. Better still, you may globally modify the stylistic attributes of the pictured shortcode from within Yabber.
The shortcode of [pictured]My Custom Caption Text[/pictured] will return:
Pictured: This is pictured shortcode. We may optionally include a link to the image with a shortcode attribute, but this is usually excluded (see also an FAQ on the 'Featured Image Shortcode').
You may also include the caption text associated with a specific image by wrapping the numeric ID of the image in the pictured tags. Shortcode of [pictured]72199[/pictured] returns:
Pictured: Using the standard method of showing an image is perfectly acceptable. You select the 'Add Media' button in your post editor, upload an image, populate the alt, title, and caption text boxes, and a bunch of HTML is returned to your page.
The shortcode links are available directly from the WP Media Library by selecting the applicable image.
To alter the style of the Pictured text, navigate your way to the 'Plugins' menu item within the 'Website' module and select 'Pictured (Caption) Shortcode'. From the style panel, select your website and then define your default style. Only minimal options are currently returned.

Pictured: Select your website and then define your default style. Only minimal options are currently returned. Changes are made immediately on your website.
Click Save. Once changes are made they become effective on your website immediately.
Define Default Image Attributes in Yabber
You may change your website design in the future, or you may have a need to tune stylistic performance, and this can all be managed entirely from within Yabber in a couple of seconds. Navigate to the 'Plugins' menu within the 'Website' module and select the 'Images' panel. Select your default values and save. Changes are made on your website immediately.

Pictured: Navigate to the 'Plugins' menu within the 'Website' module and select the 'Images' panel. Select your default values and save. Changes are made on your website immediately.
Image Shortcode Attributes
A number of shortcode options apply that'll alter the image returned to your page. What the shortcode is capable of, and what you'll actually use it for, are two entirely different things - particularly since WordPress now supports cropping and editing (something you can do with the shortcode, but something we won't introduce).
width
height
align
left or right (normally used when making images smaller and paragraph-aligned).link
alt
alt value. Will inherit the alt value as defined in the WP Media library by default. Alter by using alt="My Alt Text" in your shortcode.title
title="My Title".caption
0 (false). If caption="1" is used the standard WordPress caption will render. The caption is sourced via the WordPress image library value. You should generally consider using the pictured attribute instead.pictured
0 (false). If pictured="1" is used the standard WordPress caption will render. The caption is sourced via the WordPress image library value.quality
75. The image will always be scaled and optimised based on your defined width.linksize
Generally speaking, it'll only ever be the width and align attributes that you might consider using.
■ ■ ■
Related Linking FAQs
Related Linking FAQs. Includes 'Series' blocks.
Your website includes a very large number of methods to include different types of headings, including and (both of which serve a specific purpose), with other shortcode and Elementor tools making the addition of various 'headings' a piece of cake. While there are any number of ways to generate page titles, the 2015.3 website framework… [ Learn More ]
In a previous FAQ we look at how to menus which would render a list or string of bulleted links. While not the intended purpose, you may use the same system to create bulleted lists of any type and use them as standard lists on your website. This FAQ will show you how this is… [ Learn More ]
In a we look at the various parameters that could be passed in a URL for the purpose of tracking links. While all URL parameters are tracked in some way, those listed are considered primary within the Xena Analytics module in that they are intrinsically linked to the Triggerly module. One of those parameters listed… [ Learn More ]
UTM and Tracking tags are applied in a URL for the purpose of tracking links and campaigns sources. This FAQ will not take a deep dive into what URL tracking parameters are or how they're used. Instead, we'll primarily look at supported Yabber tracking tags (the word 'supported' is somewhat of a misnomer because all… [ Learn More ]
A short or truncated URL is rooted in olden day Usenet and bulleting board services. A user would often post a link to a discussion, and that link would line wrap or become difficult to use. The solution was to take a short URL that would link to the longer URL. One of the first… [ Learn More ]
An inline frame (iframe) is a HTML element that loads another HTML page within the document. It essentially puts another webpage within the parent page. The modal link we're about to describe loads a very simple modal and then loads the content of another page within that iframe. Because it's a feature that's rarely used,… [ Learn More ]
Conditional Content is content that is delivered to a user based on resolved borrowing objective, occupation, campaign links, or interest. In the property field the Interest might be a particular type of property or a category of buyer. Supported by , the use of Conditional Content must be considered an advanced feature, although those elements… [ Learn More ]
In this FAQ we'll provide the basic shortcode necessary to return a video modal to your page. There are two methods for returning a video modal: a Yabber modal, and a full screen modal, with the former preferred because it is fully tracked and integrated with the . The Yabber modal is returned with the… [ Learn More ]
In an FAQ titled we looked at how to assign videos to the and Pages on your website. Familiarity with the former module is required, as this FAQ will simply show you how to link directly to a video that was assigned to a specific lender in that modules. Confused yet? This feature is one… [ Learn More ]
Your website modal module is the most sophisticated in the industry, and one of the most powerful systems created for any industry. A large number of FAQs reference how the modal system functions, with most of the functionality focused on entry and exit modals, with the modal resolved by your preference, interest or resolved borrowing… [ Learn More ]
Every link on your website must be tracked - it's a marketing imperative, and one of the defining features of a funnel... and this obviously includes download links. This FAQ will show you how to create a basic Download Link with the universal shortcode. There are a few ways of creating the download link, and… [ Learn More ]
Linking from one page to another is a bread and butter website feature, but the standard method of linking is static and prone to failure, so we've introduced our own 'dynamic' method of internal and external linking that mitigates the weakness in links that are created in the standard WordPress editor. Our method is optional… [ Learn More ]
In an FAQ titled we described how to add or alter the General Disclaimer at the bottom of every page. This area includes your general disclaimer, Licencing details, ACL or Credit Rep attributes, or anything else your parent ACL holder deems necessary. That same article showed how to include an always up-to-date, fully trackable, and… [ Learn More ]
Quite frankly, the Lender Archive Page link shortcode is rather pointless because the standard link shortcode is arguably more effective. The reason it exists is because we have other plans for how the shortcode is to be used. So, if you're linking to a specific lender archive, such as that for the , use the… [ Learn More ]
A tooltip is simply a simple bubble that appears above text when a user hovers over a particular term or string of text, such as . To render the last example, we've used the shortcode, but we discourage its use - in fact, the shortcode itself and available attributes are ignored. Instead, if you want… [ Learn More ]
In a previous FAQ we introduced how to render an . The shortcode is optional but highly recommended because of the freedom and global flexibility that the shortcode provides. There are occasions where you simply want to link to an image rather than render it to a page, particularly when there's a large number of… [ Learn More ]
Straight up - this is going to get weird. You're probably familiar with the standard way in which to add images to your website. You select the 'Add Media' button in your post editor, upload an image, and a bunch of HTML is returned to your page. That's arguably the easiest way of including an… [ Learn More ]
Website Post Glossary Tooltip Terms are those terms in your glossary that, when used on your website in articles, will automatically carry a tooltip term sourced from your glossary. The text evaluated for automated tooltip terms are selectively sourced from your Glossary. This FAQ will show you how to use the module. You should first… [ Learn More ]
When you have your website delivered, it will include a 'Finance and Property Glossary' at yourDomain/resources/mortgage-glossary, and it will be accessible via the 'Resources' menu and various other locations. Depending on whether we set the website up for you, or you chose to set it up yourself, the glossary may or may not exist on… [ Learn More ]
The Page Titles module creates and manages titles on around 35 internal (secondary) pages. The title block consists of a title with link, secondary link block, and optional block of text. All title inclusions are optional. An update will shortly take effect that permits the inclusion of a third link of text in the standard… [ Learn More ]
A Link Block is a group of links that may be presented in various ways, such as in accordion panels, a list, or in titles. A number of other modules may reference Link Blocks to ensure that the content returned to your website is dynamic and easily managed. You will find the Link Block options… [ Learn More ]
Related Image FAQs
Related images FAQs as they apply to Yabber and your Website.
You have a best interest duty requirement imposed upon you that essentially mandates you quickly communicate rate data to your clients - first when the board makes a cash rate decision, and then later when changes are made, or when repricing might be appropriate. Yabber provide a basic facility to create an RBA Cash Rate… [ Learn More ]
The Image Factory - part of the broader Media Factory which is closely connected to the Social Sendify module - is very much a legacy system, but it may still return content that might be of value on Social Media. Generative AI has diminished the value of the point-and-click tools we've used since 2007, so… [ Learn More ]
In a previous FAQ we introduced how to render an . The shortcode is optional but highly recommended because of the freedom and global flexibility that the shortcode provides. There are occasions where you simply want to link to an image rather than render it to a page, particularly when there's a large number of… [ Learn More ]
Straight up - this is going to get weird. You're probably familiar with the standard way in which to add images to your website. You select the 'Add Media' button in your post editor, upload an image, and a bunch of HTML is returned to your page. That's arguably the easiest way of including an… [ Learn More ]
The Screenshots shortcode will embed a screenshot of a remote webpage into your own website. Initially created for the well over 10-years ago, the tool has since created millions of screenshots reliably and almost without error. Screenshots isn't one of those features you'll use every day, but like a lot of what you'll find in… [ Learn More ]
In order to represent your panel of lenders on your website, most brokers will use a silly slider of static images, and others will use a single fixed image comprised of multiple images - just a lazy solution. Your website includes a grid of images that links to the application that'll showcase the primary and… [ Learn More ]
When a PDF image is , we often make an attempt to manufacture an image to represent the uploaded asset. This action is usually based on level of access, and the result is never as persuasive as something you might create yourself. This FAQ will details how to associate an image with a PDF or… [ Learn More ]
Yabber requires a number of images in order to perform certain tasks, such as white-labelling marketing material, created Fact Find report consumer guides, creating SEO markup, and so on. The following images are required: Company Logo. 500px x 500px Black and White Company Logo. 500px x 500px Wide Company Logo. 600px x 100px SEO Logo.… [ Learn More ]
When Testimonials are received - regardless or whether of not they're - we will manufacture a suite of testimonial images that are suitable for social media. These images are all sent to your once created. The Vista assignment will be blank, meaning that they won't send to any social networks; you should review the images,… [ Learn More ]

